Deploying VMs
This guide walks you through deploying virtual machines in Kube-DC using both the Console UI and kubectl manifests.
Prerequisites
- A Kube-DC Cloud project
- CLI access configured —
kubectlworking against your project - (Optional) The
virtctlplugin for VM console access
VM Components
Kube-DC virtualization is powered by KubeVirt and uses three main resources:
- DataVolume — manages the VM's disk image (downloads cloud images, provisions PVCs)
- VirtualMachine — defines the VM configuration, resources, and lifecycle
- VirtualMachineInstance (VMI) — represents a running VM instance
Creating a VM via Console UI
Step 1: Open VM Creation
- Select your project from the sidebar
- Navigate to Virtual Machines
- Click + to create a new VM
Step 2: Configure the VM
- VM Name — choose a name (e.g.,
ubuntu) - Operating System — select from available images (Ubuntu 22.04 / 24.04 / 26.04, Debian 12, CentOS Stream 9, Fedora 42, openSUSE Leap 15.6, Alpine 3.21, Gentoo, Windows 11)
- Version (optional, advanced) — most Linux families now expose multiple maintained versions (e.g., Ubuntu 24.04 currently keeps
20260321,20260225,20260209,20260131). Leave the dropdown on Latest to take the newest mirrored bytes — Kube-DC keeps/latest/pointing at the freshest version per family, refreshed weekly. Pin a specific version only if you need reproducibility against a known build. - vCPUs and RAM — set resources based on your workload
- Root Storage Size — set disk size (e.g., 12 GB for Linux, 70 GB for Windows)
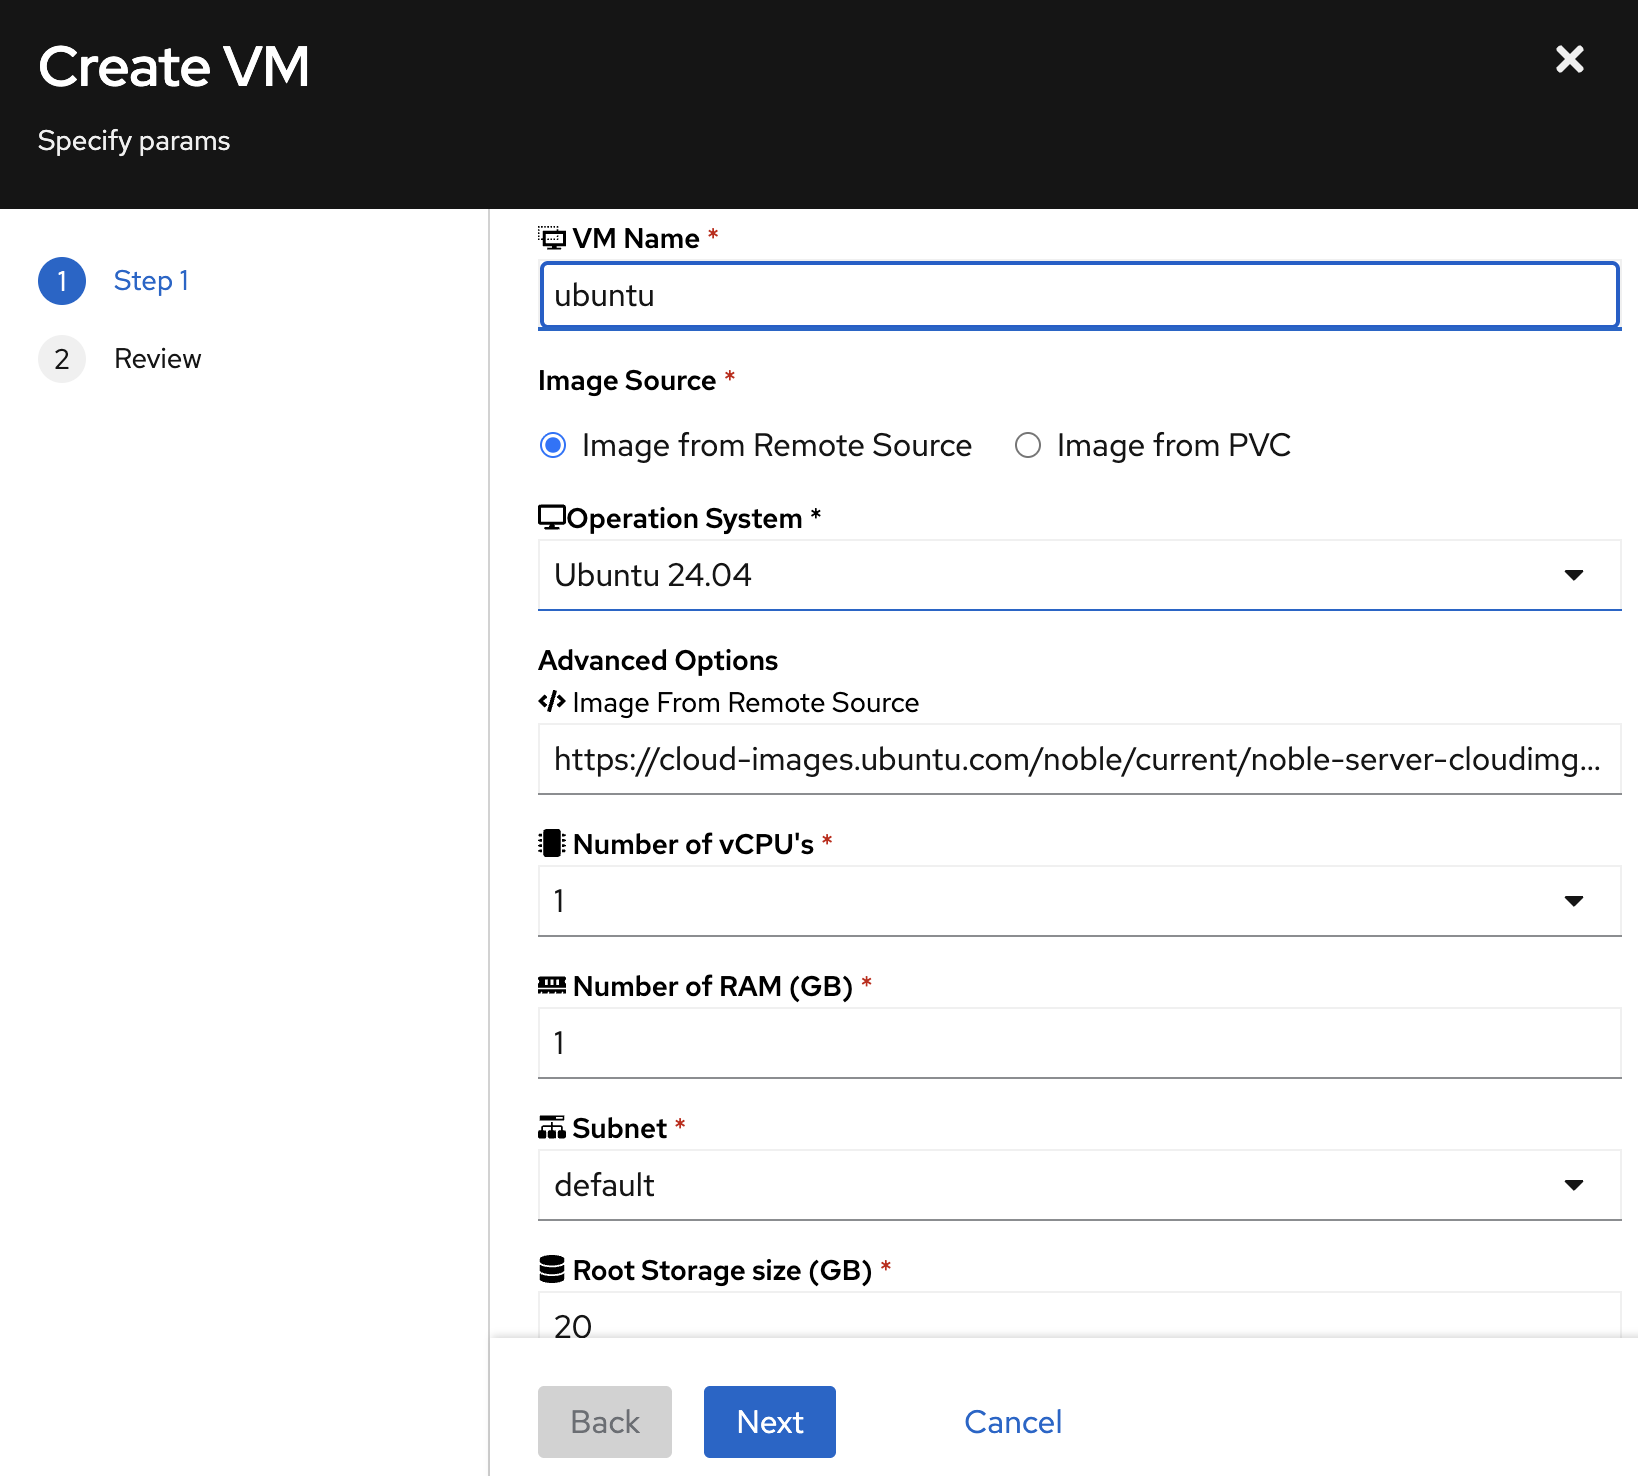
Step 3: Review and Create
Click Next to review the generated YAML, then Finish to create the VM.
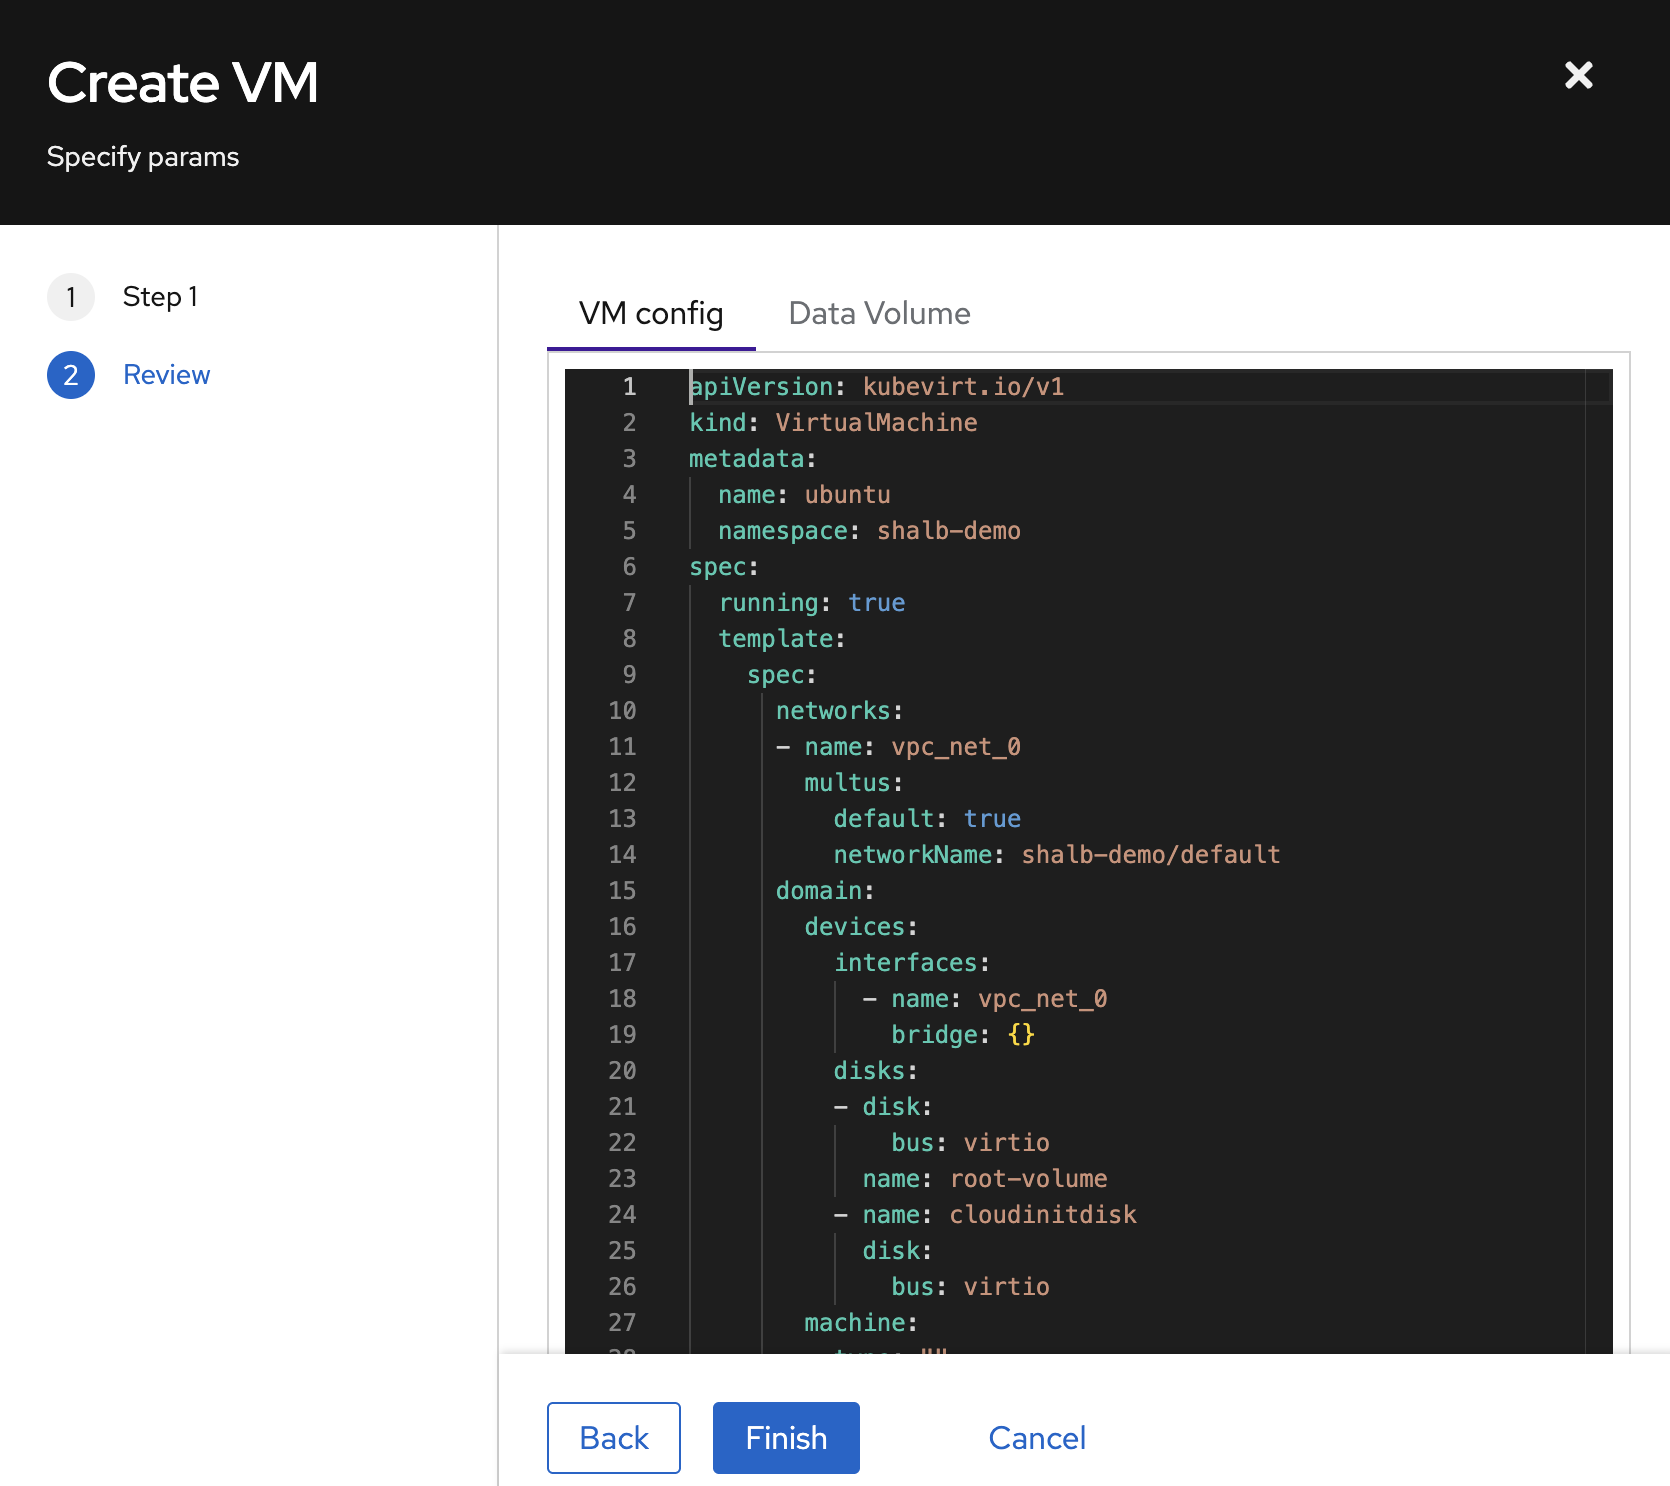
The VM will appear in the list. Wait for the status to reach Running.
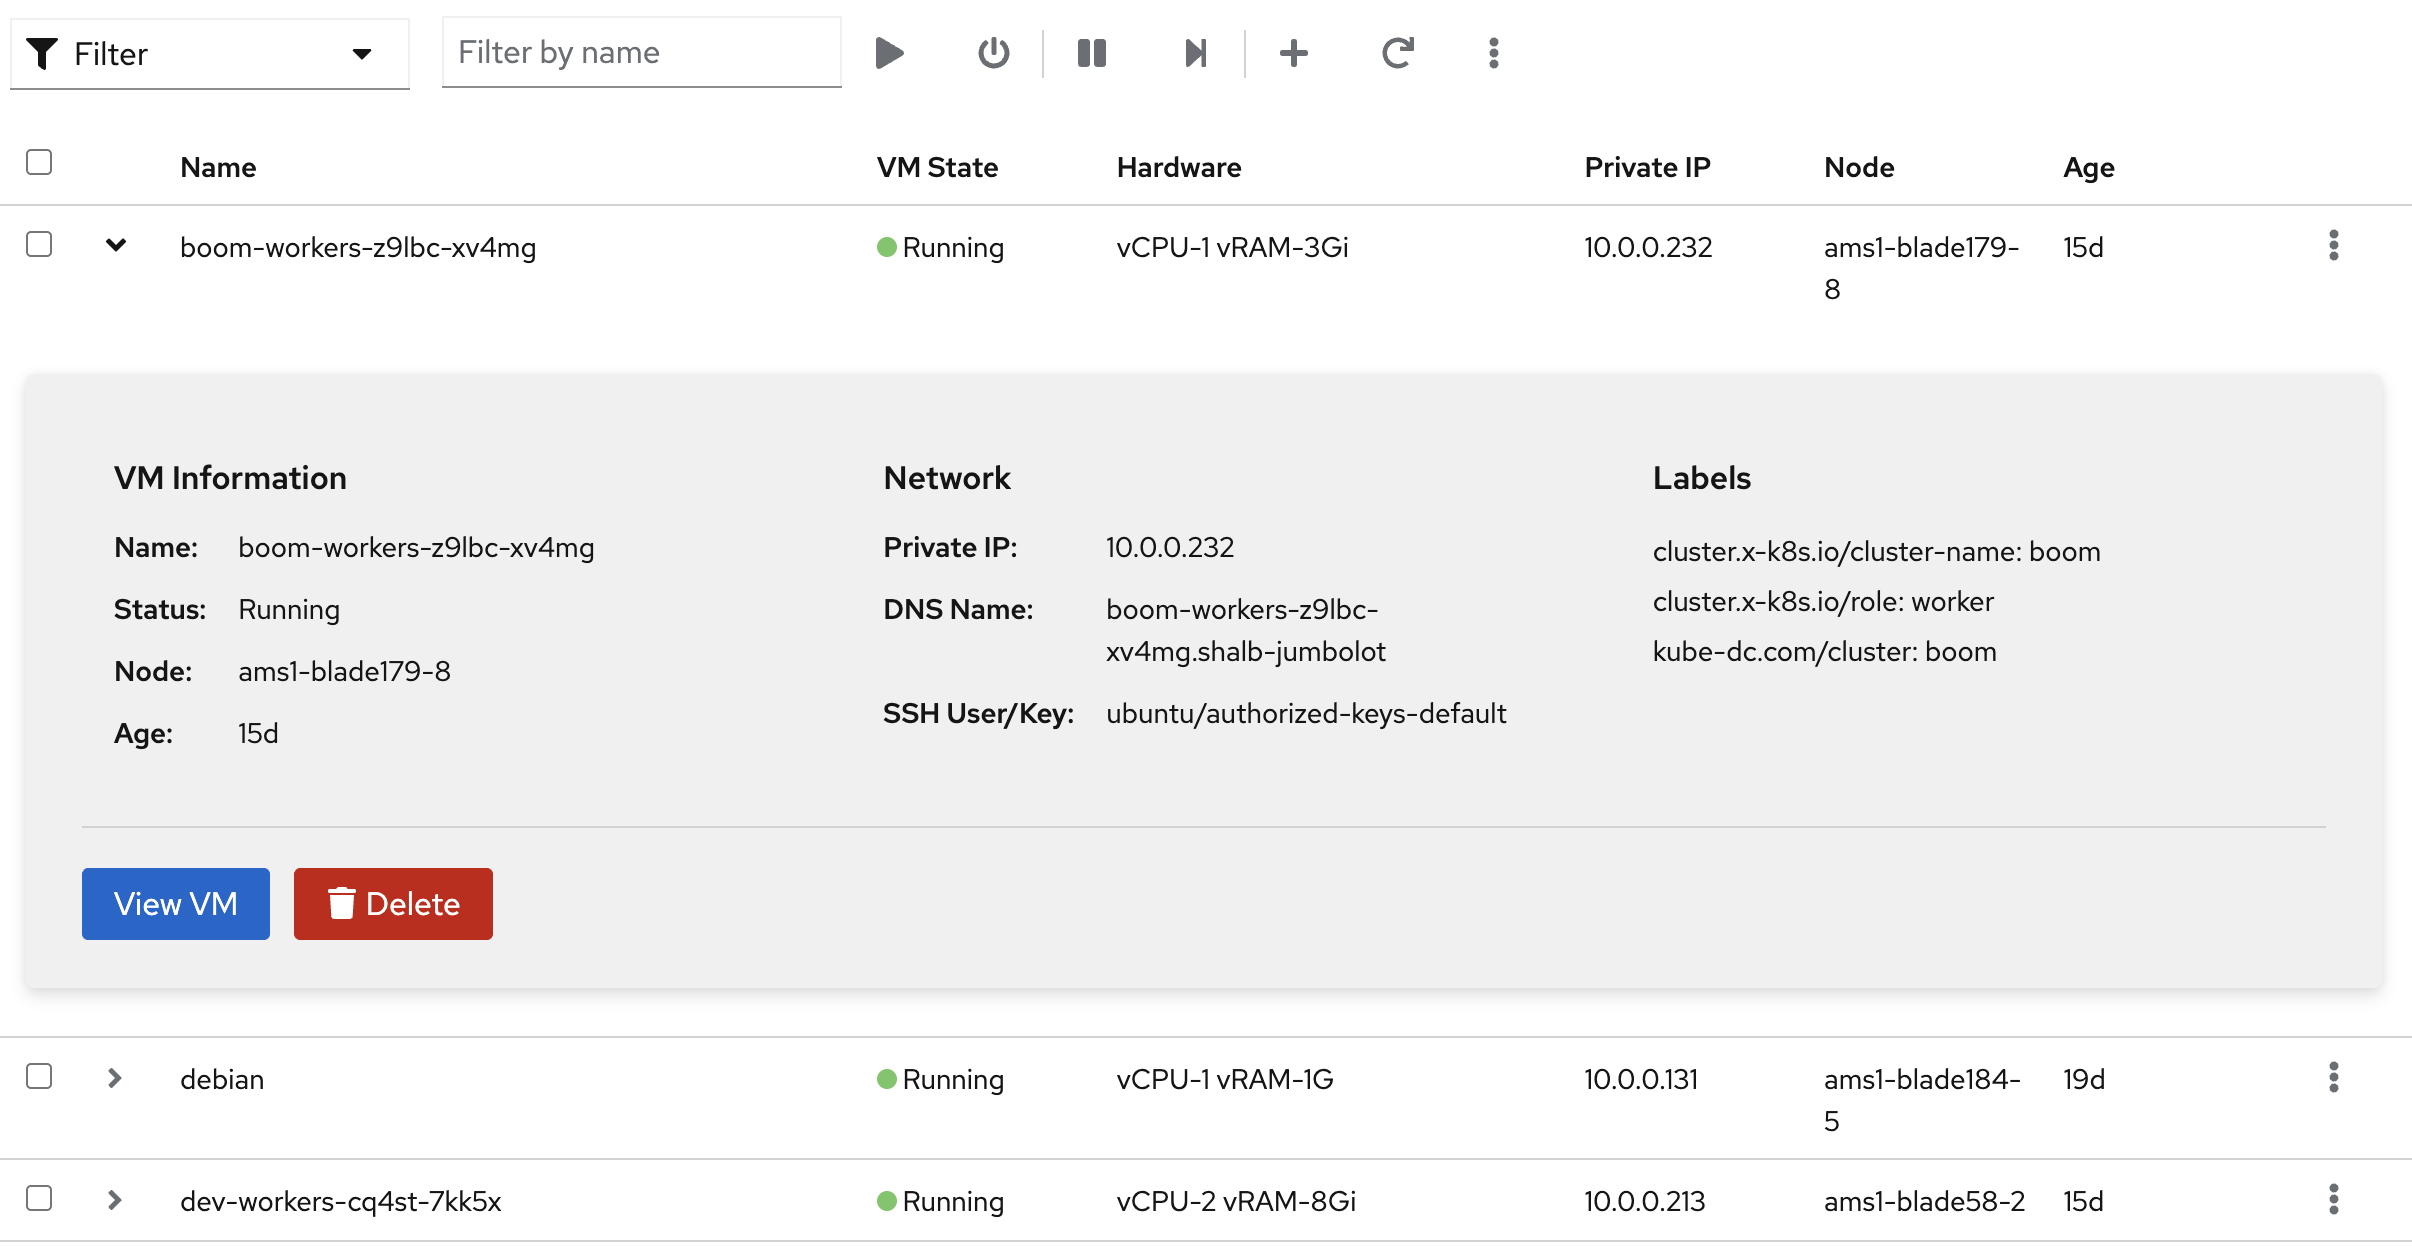
Managing VMs
Click on a VM to view its details — OS info, status, performance metrics, and conditions.
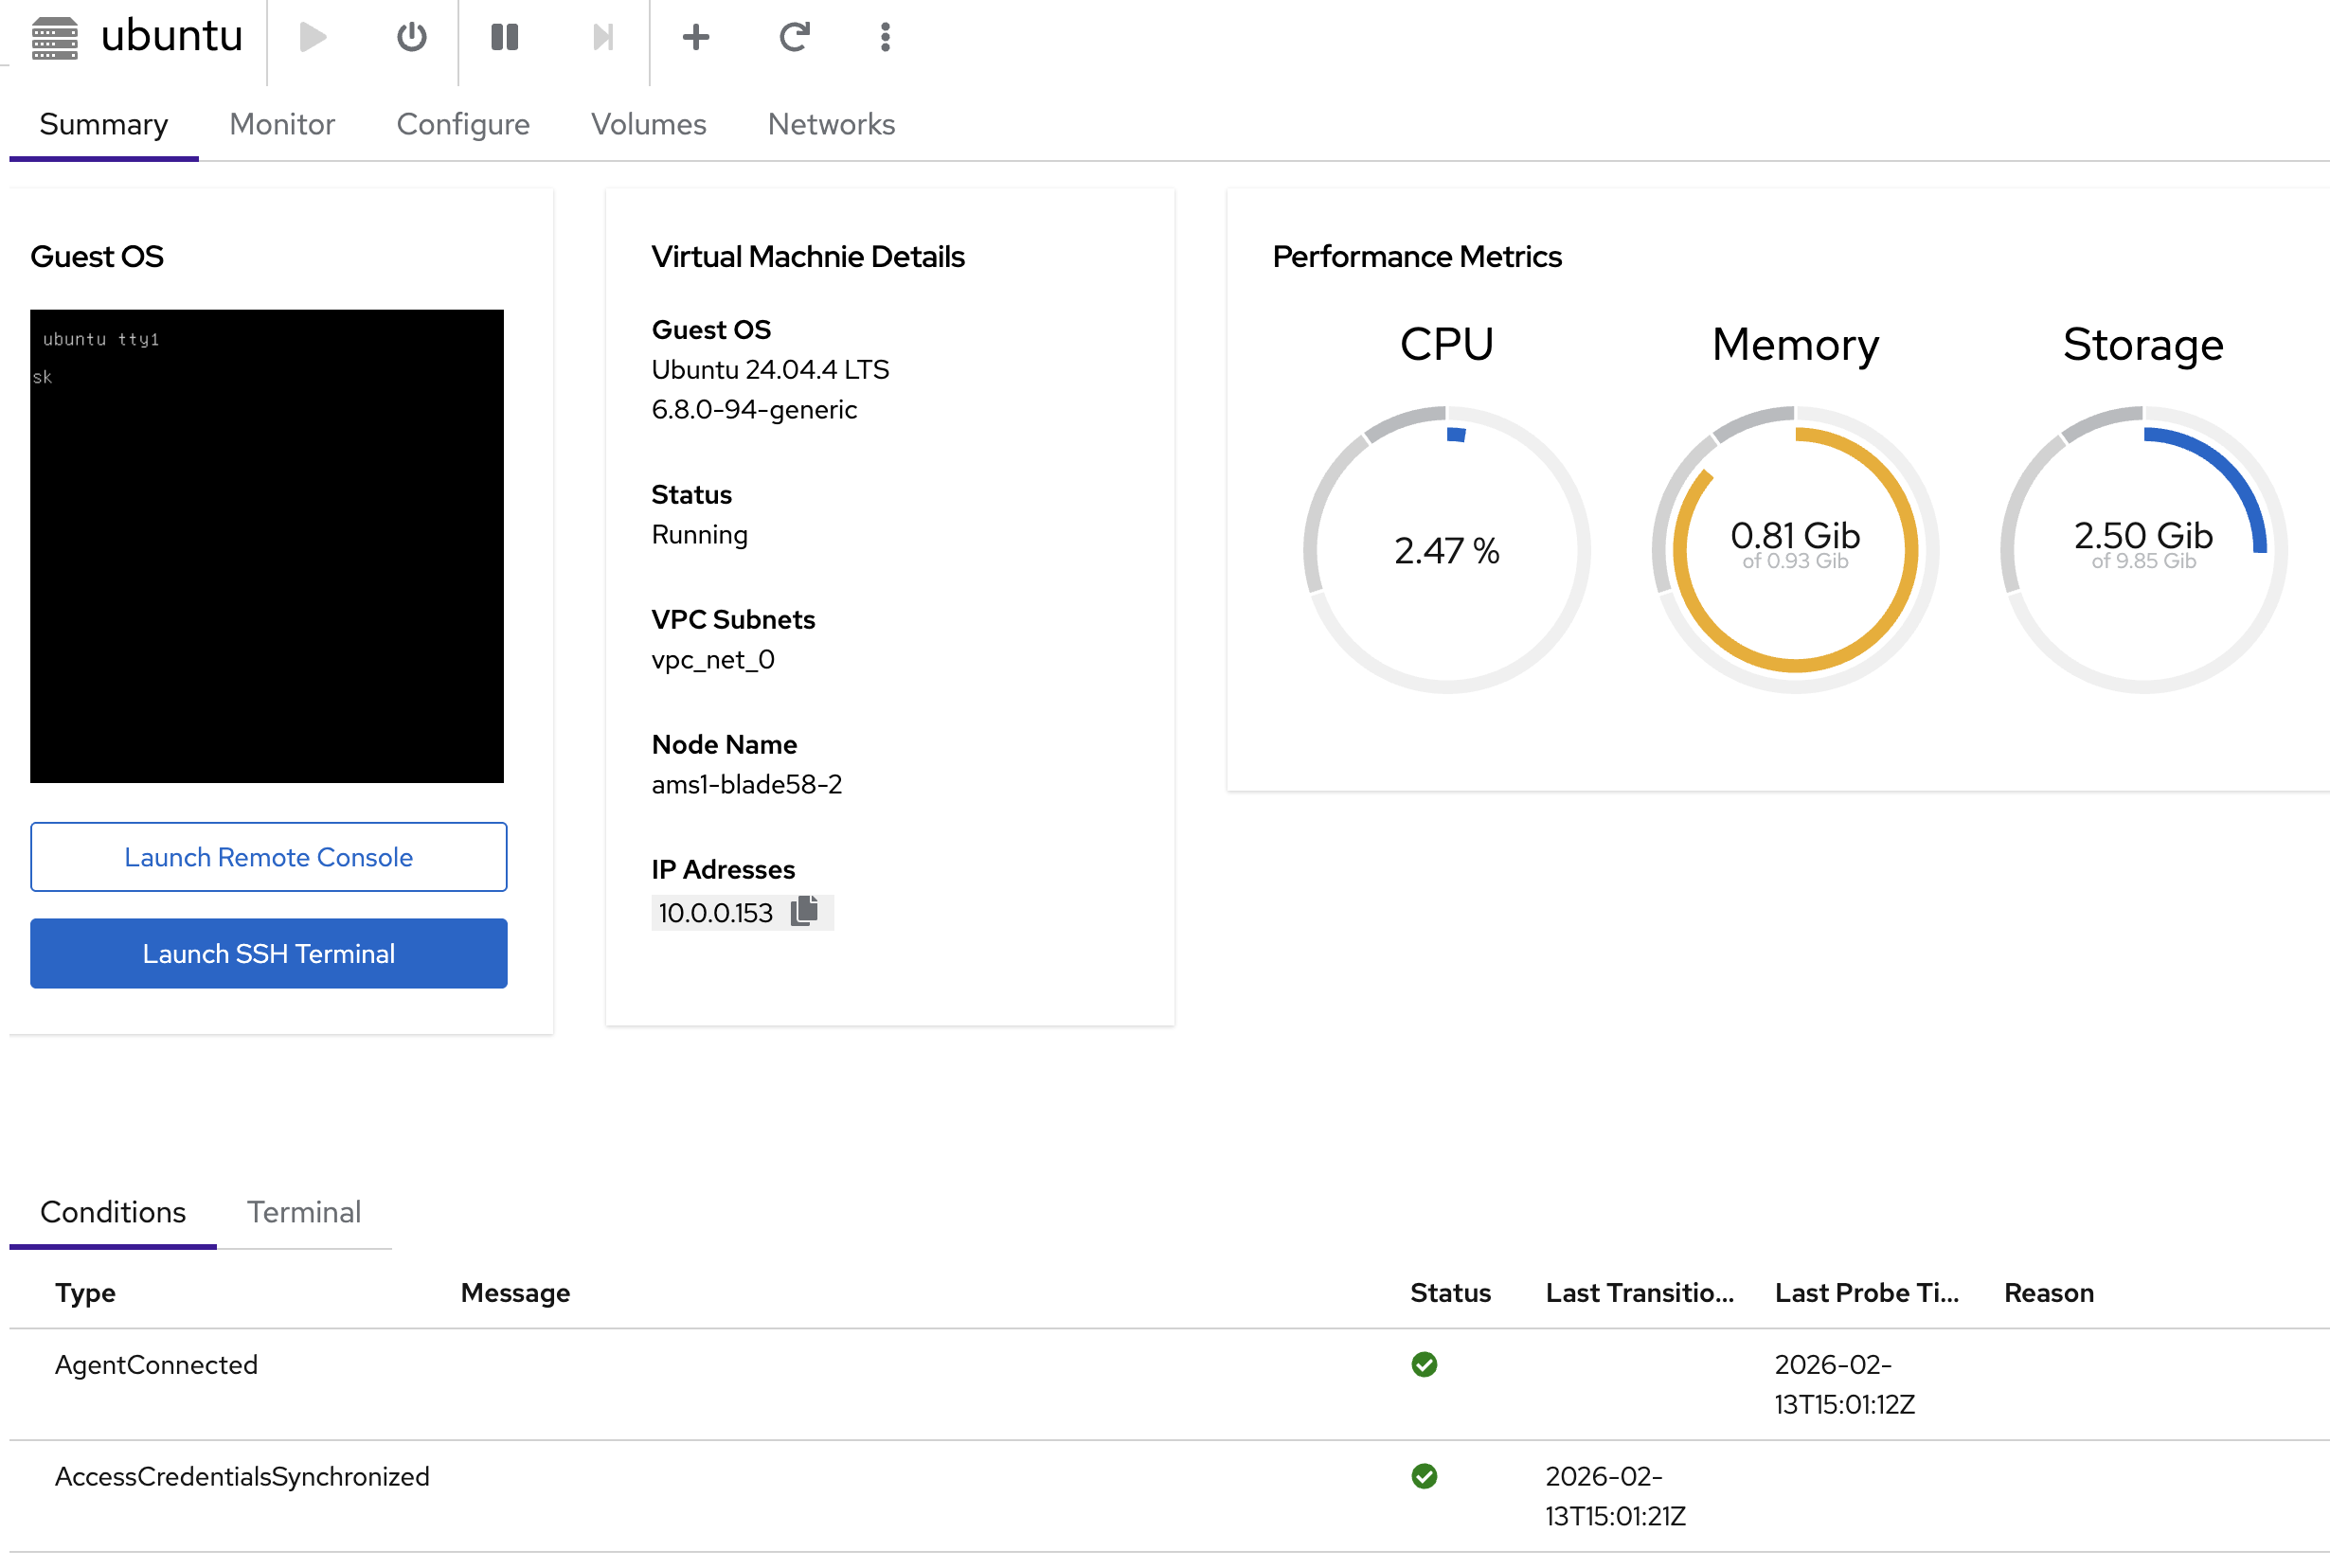
From the details page you can:
- Launch Remote Console — graphical console in the browser
- Launch SSH Terminal — web-based SSH terminal
- Start / Stop / Restart / Delete — manage the VM lifecycle
Creating a VM via kubectl
Ubuntu 24.04
Ubuntu 24.04 — DataVolume + VirtualMachine manifest
apiVersion: cdi.kubevirt.io/v1beta1
kind: DataVolume
metadata:
  name: ubuntu-root
spec:
  pvc:
    accessModes:
    - ReadWriteOnce
    resources:
      requests:
        storage: 12G
    storageClassName: local-path
  source:
    http:
      url: https://cloud-images.ubuntu.com/noble/current/noble-server-cloudimg-amd64.img
---
apiVersion: kubevirt.io/v1
kind: VirtualMachine
metadata:
  name: ubuntu
spec:
  running: true
  template:
    spec:
      networks:
      - name: vpc_net_0
        multus:
          default: true
          networkName: your-namespace/default  # Replace 'your-namespace' with your actual project namespace
      domain:
        cpu:
          cores: 1
        memory:
          guest: 1G
        devices:
          interfaces:
          - name: vpc_net_0
            bridge: {}
          disks:
          - name: root-volume
            disk:
              bus: virtio
          - name: cloudinitdisk
            disk:
              bus: virtio
      accessCredentials:
      - sshPublicKey:
          source:
            secret:
              secretName: authorized-keys-default
          propagationMethod:
            qemuGuestAgent:
              users:
              - ubuntu
      readinessProbe:
        guestAgentPing: {}
        failureThreshold: 10
        initialDelaySeconds: 30
        periodSeconds: 10
        timeoutSeconds: 5
      volumes:
      - name: root-volume
        dataVolume:
          name: ubuntu-root
      - name: cloudinitdisk
        cloudInitNoCloud:
          userData: |
            #cloud-config
            package_update: true
            package_upgrade: true
            packages:
              - qemu-guest-agent
            runcmd:
              - systemctl enable --now qemu-guest-agent
kubectl apply -f ubuntu-vm.yaml
The accessCredentials section injects your SSH public key from the authorized-keys-default secret into the VM via the QEMU guest agent. The users field must match the default user for the OS image (ubuntu for Ubuntu, debian for Debian).
Accessing VMs via SSH
Once the VM is running, you can SSH into it using the private key stored in your project's ssh-keypair-default secret.
Step 1: Extract the SSH Private Key
# Extract the private key from the secret
kubectl get secret ssh-keypair-default -n <your-namespace> -o jsonpath='{.data.id_rsa}' | base64 -d > /tmp/vm_ssh_key
chmod 600 /tmp/vm_ssh_key
Step 2: Get the VM's IP Address
For VMs with a Floating IP (FIP):
# Get the external IP from the FIP resource
kubectl get fip -n <your-namespace>
For VMs without FIP (internal access only):
# Get the internal IP from the VMI
kubectl get vmi <vm-name> -n <your-namespace> -o jsonpath='{.status.interfaces[0].ipAddress}'
Step 3: Connect via SSH
# SSH using the extracted private key
ssh -i /tmp/vm_ssh_key <username>@<ip-address>

# Examples:
# Ubuntu VM: ssh -i /tmp/vm_ssh_key ubuntu@91.224.11.9
# Debian VM: ssh -i /tmp/vm_ssh_key debian@10.0.0.131
- Ubuntu:
ubuntu - Debian:
debian - Windows:
kube-dc
Debian 12
Debian 12 — DataVolume + VirtualMachine manifest
apiVersion: cdi.kubevirt.io/v1beta1
kind: DataVolume
metadata:
  name: debian-root
spec:
  pvc:
    accessModes:
    - ReadWriteOnce
    resources:
      requests:
        storage: 20G
    storageClassName: local-path
  source:
    http:
      url: https://cloud.debian.org/images/cloud/bookworm/latest/debian-12-generic-amd64.qcow2
---
apiVersion: kubevirt.io/v1
kind: VirtualMachine
metadata:
  name: debian
spec:
  running: true
  template:
    spec:
      networks:
      - name: vpc_net_0
        multus:
          default: true
          networkName: your-namespace/default  # Replace 'your-namespace' with your actual project namespace
      domain:
        cpu:
          cores: 1
        memory:
          guest: 1G
        devices:
          interfaces:
          - name: vpc_net_0
            bridge: {}
          disks:
          - name: root-volume
            disk:
              bus: virtio
          - name: cloudinitdisk
            disk:
              bus: virtio
      accessCredentials:
      - sshPublicKey:
          source:
            secret:
              secretName: authorized-keys-default
          propagationMethod:
            qemuGuestAgent:
              users:
              - debian
      readinessProbe:
        guestAgentPing: {}
        failureThreshold: 10
        initialDelaySeconds: 30
        periodSeconds: 10
        timeoutSeconds: 5
      volumes:
      - name: root-volume
        dataVolume:
          name: debian-root
      - name: cloudinitdisk
        cloudInitNoCloud:
          userData: |
            #cloud-config
            package_update: true
            package_upgrade: true
            packages:
              - qemu-guest-agent
            runcmd:
              - systemctl enable --now qemu-guest-agent
Windows 11
Windows VMs require additional configuration for UEFI boot, TPM, and Hyper-V features:
Windows 11 — DataVolume + VirtualMachine manifest
apiVersion: cdi.kubevirt.io/v1beta1
kind: DataVolume
metadata:
  name: win-root
spec:
  pvc:
    accessModes:
    - ReadWriteOnce
    resources:
      requests:
        storage: 70G
    storageClassName: local-path
  source:
    http:
      url: https://iso.stage.kube-dc.com/windows11-x64-golden.qcow2
---
apiVersion: kubevirt.io/v1
kind: VirtualMachine
metadata:
  name: win
spec:
  running: true
  template:
    spec:
      networks:
      - name: vpc_net_0
        multus:
          default: true
          networkName: your-namespace/default  # Replace 'your-namespace' with your actual project namespace
      domain:
        cpu:
          cores: 2
          model: host-model
        memory:
          guest: 8G
        features:
          acpi: {}
          apic: {}
          hyperv:
            frequencies: {}
            relaxed: {}
            reset: {}
            runtime: {}
            spinlocks:
              spinlocks: 8191
            synic: {}
            vapic: {}
            vpindex: {}
          smm:
            enabled: true
        firmware:
          bootloader:
            efi:
              persistent: true
              secureBoot: false
        devices:
          interfaces:
          - name: vpc_net_0
            bridge: {}
          disks:
          - name: root-volume
            disk:
              bus: virtio
          - name: cloudinitdisk
            disk:
              bus: virtio
          tpm:
            persistent: true
      accessCredentials:
      - sshPublicKey:
          source:
            secret:
              secretName: authorized-keys-default
          propagationMethod:
            qemuGuestAgent:
              users:
              - kube-dc
      readinessProbe:
        guestAgentPing: {}
        failureThreshold: 10
        initialDelaySeconds: 30
        periodSeconds: 10
        timeoutSeconds: 5
      volumes:
      - name: root-volume
        dataVolume:
          name: win-root
      - name: cloudinitdisk
        cloudInitNoCloud:
          userData: ""
Windows cloud images must be pre-built with VirtIO drivers and the QEMU guest agent installed. See Managing OS Images and Windows VM Setup for details on preparing golden images.
Monitor VM Status
# List VMs
kubectl get vm

# Watch a VM come up
kubectl get vm -w

# Check running instances and IP addresses
kubectl get vmi
Exposing VMs with Floating IPs
Floating IPs (FIPs) provide direct public IP access to a VM. The FIP automatically resolves the VM's internal IP via the QEMU guest agent — no need to look up IP addresses manually.
apiVersion: kube-dc.com/v1
kind: FIp
metadata:
  name: debian-fip
spec:
  externalNetworkType: public
  vmTarget:
    vmName: debian
    interfaceName: vpc_net_0
kubectl apply -f debian-fip.yaml
Check the assigned external IP:
kubectl get fip
NAME         TARGET IP    EXTERNAL IP    VM       INTERFACE   READY
debian-fip   10.0.0.131   91.224.11.16   debian   vpc_net_0   true
You can now SSH directly to the VM:
ssh debian@91.224.11.16
When using externalNetworkType: public on a FIP, a dedicated public EIP is automatically allocated and bound. You don't need to create an EIP separately.
Exposing VM Ports via LoadBalancer
For exposing specific ports (e.g., SSH on a non-standard port) without a dedicated public IP, use a LoadBalancer service:
apiVersion: v1
kind: Service
metadata:
  name: ubuntu-ssh
  annotations:
    service.nlb.kube-dc.com/bind-on-default-gw-eip: "true"
spec:
  type: LoadBalancer
  selector:
    vm.kubevirt.io/name: ubuntu
  ports:
  - name: ssh
    port: 2222
    targetPort: 22
This binds to the project's shared EIP. Access via:
ssh -p 2222 ubuntu@<project-eip>
See the Service Exposure Guide for more options including HTTPS routes and dedicated EIPs.
Best Practices
- Use SSH keys — the
authorized-keys-defaultsecret is auto-created per project; add your public keys there - Enable guest agent — always include
qemu-guest-agentin cloud-init for proper IP reporting, readiness probes, and SSH key injection - Right-size resources — Linux VMs typically need 1 vCPU / 1 GB RAM minimum; Windows needs 2 vCPUs / 8 GB RAM
- Use readiness probes —
guestAgentPingensures the VM is fully booted before being marked Ready
Troubleshooting
| Issue | Check |
|---|---|
| VM stuck in provisioning | kubectl get dv — check DataVolume download progress |
| VM running but not Ready | kubectl get vmi — verify guest agent is connected |
| No IP assigned | Check networkName matches your project's default network |
| SSH key not injected | Verify authorized-keys-default secret exists and guest agent is running |
# Check events for errors
kubectl get events --sort-by=.lastTimestamp

# Access VM console directly
virtctl console ubuntu

# View VM serial console logs
virtctl logs ubuntu
Next Steps
- Connecting to VMs — SSH access and remote console options
- VM Lifecycle — Start, stop, restart, and snapshot VMs
- Service Exposure — Expose VM services to the internet
- Public & Floating IPs — Manage IP addresses