Provisioning a Managed Kubernetes Cluster
Kube-DC provides fully managed Kubernetes clusters that run inside your project namespace. Each cluster is an isolated, production-grade Kubernetes environment with its own control plane, worker nodes, and networking — provisioned in minutes.
How It Works
When you create a cluster, Kube-DC orchestrates several components:
- Control Plane — Managed by Kamaji. The API server, scheduler, and controller manager run as pods in your project namespace — no VMs needed for the control plane.
- Worker Nodes — Provisioned as KubeVirt virtual machines via Cluster API. Each worker is a real VM running kubelet.
- etcd DataStore — A dedicated or shared etcd cluster stores your Kubernetes state, managed automatically with TLS certificates and persistent storage.
- Cloud Controller Manager (CCM) — Bridges your tenant cluster with the infrastructure, enabling LoadBalancer services and node lifecycle management.
- Cluster Addons — Cilium CNI, CoreDNS, and optionally KubeVirt CSI are deployed automatically via Sveltos.
┌───────────────────── Management Cluster ───────────────────────────┐
│                                                                    │
│  ┌─────────── Project Namespace (e.g. shalb-jumbolot) ───────────┐ │
│  │                                                               │ │
│  │  KdcCluster "dev"                                             │ │
│  │    ├── Service: dev-cp (LoadBalancer → API server)            │ │
│  │    ├── TenantControlPlane: dev-cp (Kamaji)                    │ │
│  │    │     └── Pods: api-server, scheduler, controller-manager  │ │
│  │    ├── KdcClusterDatastore: dev-etcd                          │ │
│  │    │     └── StatefulSet: dev-etcd-etcd (etcd cluster)        │ │
│  │    ├── MachineDeployment: dev-workers                         │ │
│  │    │     └── VMs: dev-workers-xxxxx (KubeVirt)                │ │
│  │    └── CCM Deployment: kccm-dev                               │ │
│  │                                                               │ │
│  └───────────────────────────────────────────────────────────────┘ │
└────────────────────────────────────────────────────────────────────┘
                              │
                              ▼
┌────────────────── Tenant Cluster "dev" ───────────────────────────┐
│  Nodes: worker-1, worker-2, worker-3                              │
│  Your workloads: Deployments, Services, PVCs                      │
└───────────────────────────────────────────────────────────────────┘
Prerequisites
- A Kube-DC Cloud project with sufficient resource quota
- For kubectl access: kubeconfig configured for the management cluster
Managed Kubernetes Clusters View
Navigate to Kubernetes in your project to view all managed clusters:
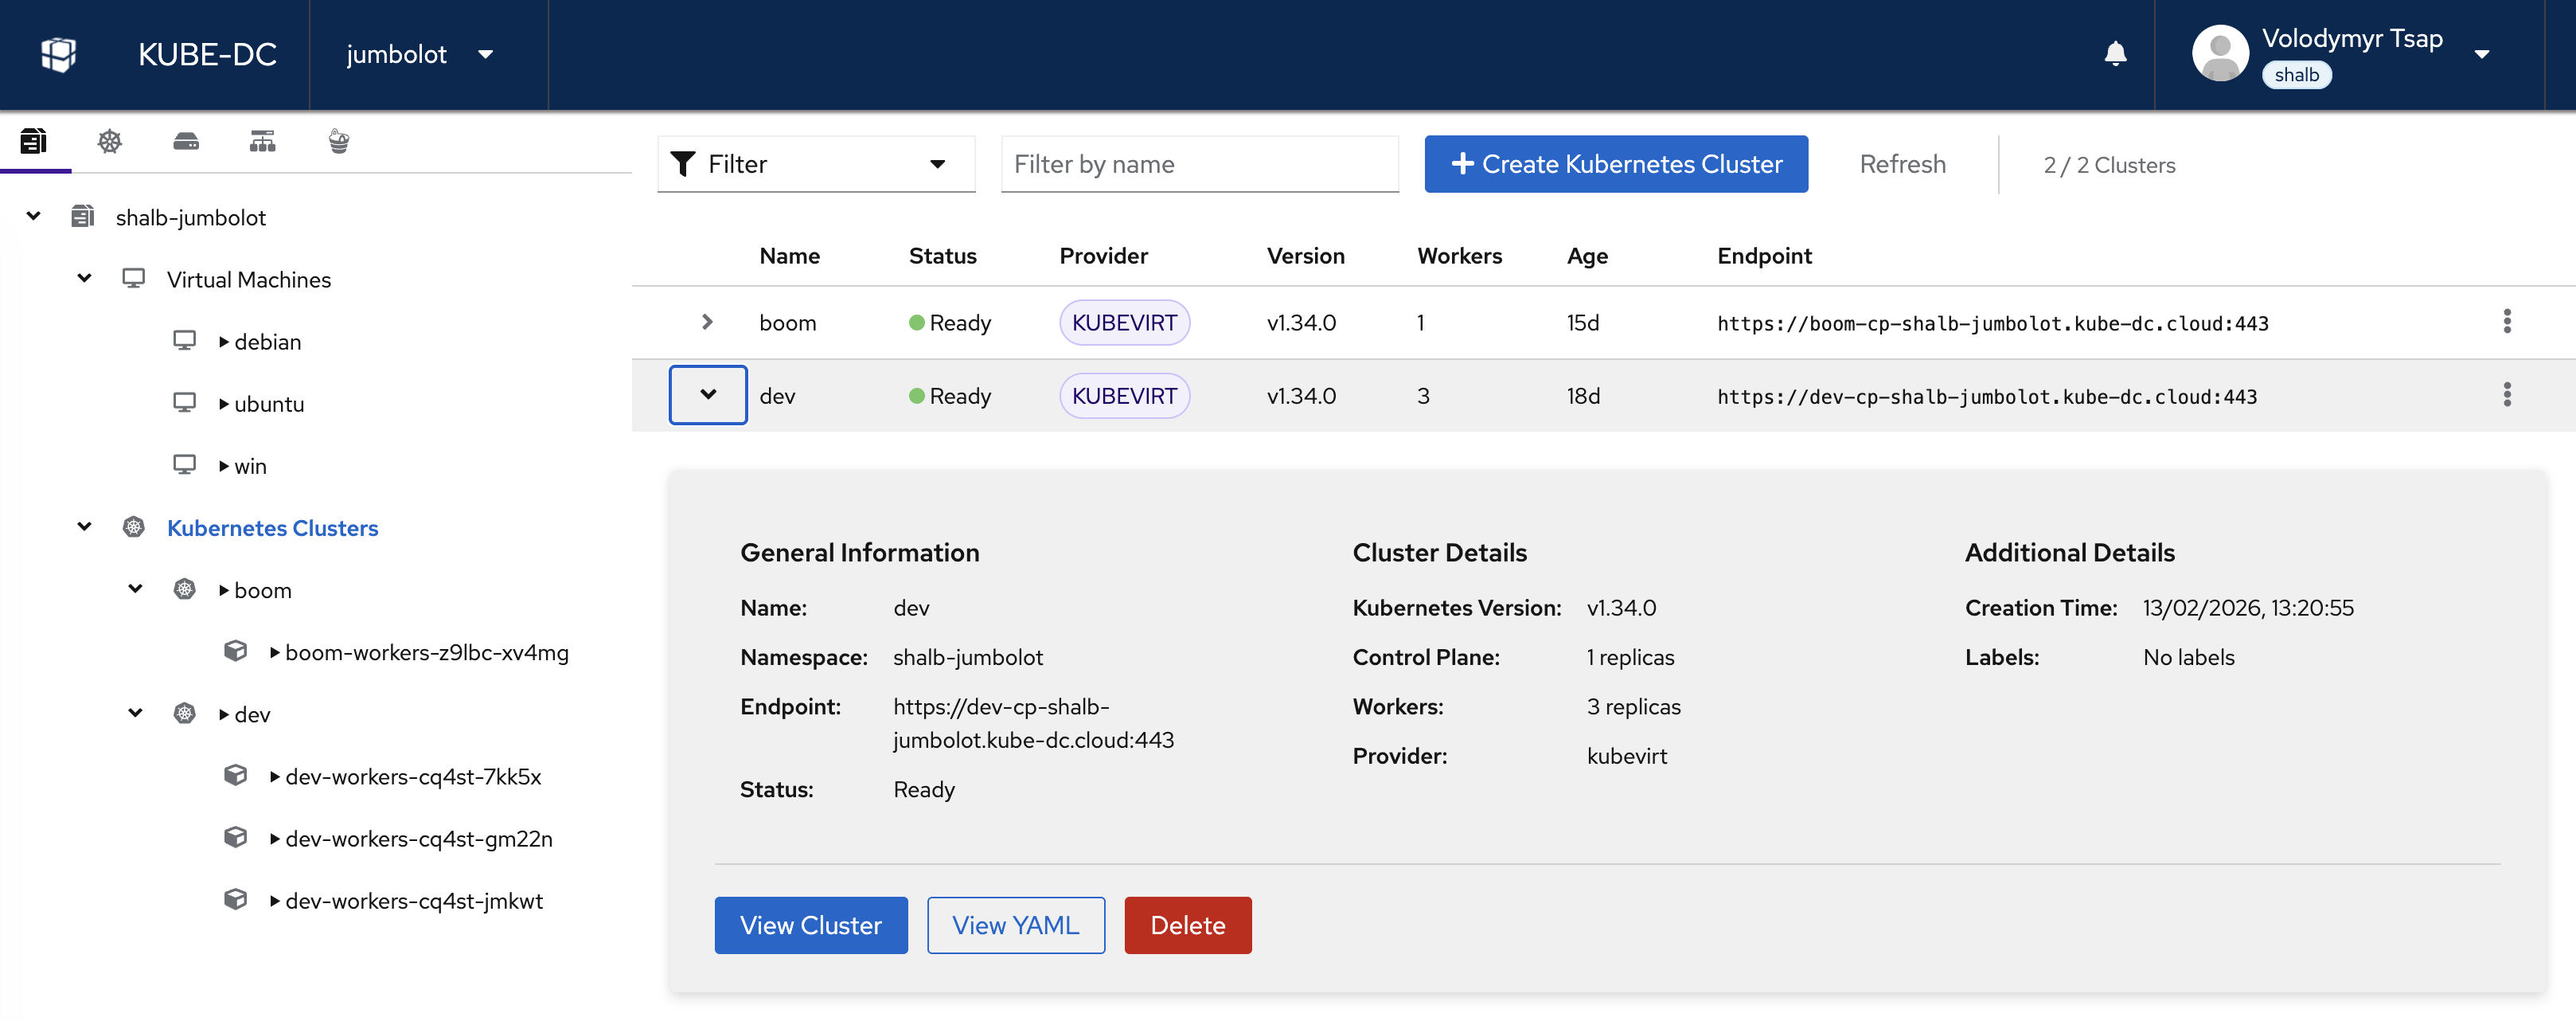
The clusters view shows all your managed Kubernetes clusters with their version, phase (status), API endpoint, datastore backend, and age. From here you can create new clusters, view cluster details, download kubeconfig files, or delete clusters.
Create a Cluster via Dashboard
The dashboard provides a guided 5-step wizard.
Step 1: Basic Configuration
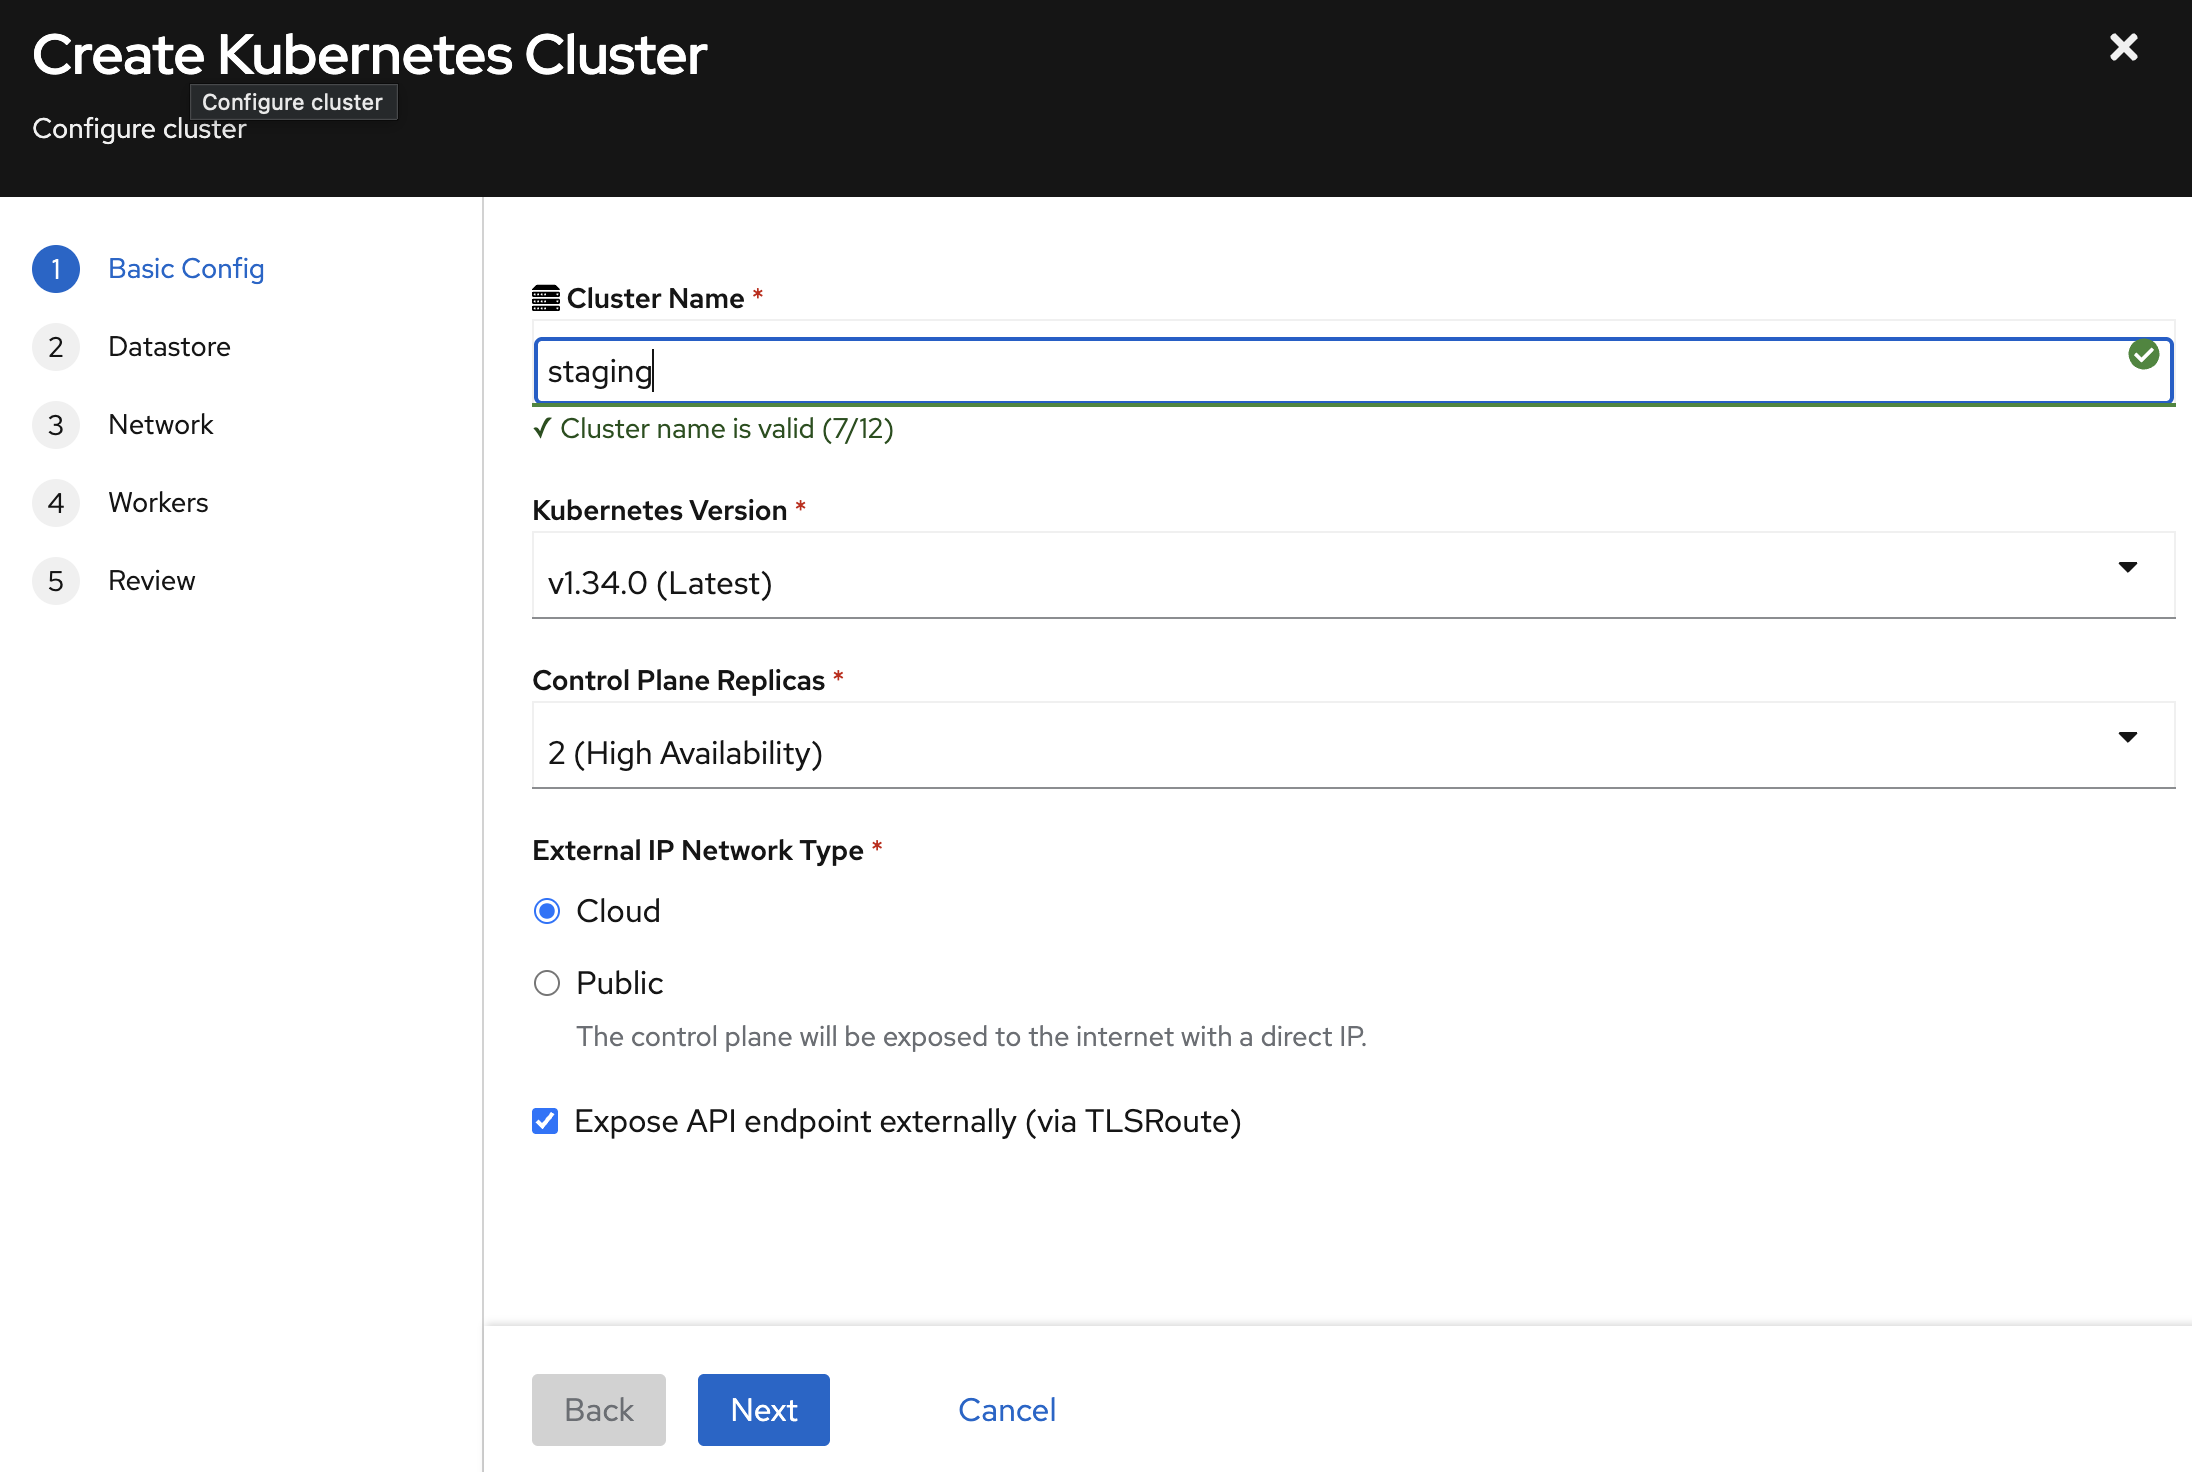
- Cluster Name — Unique within your project (3–12 chars, lowercase, hyphens allowed).
- Kubernetes Version — Select the desired version (e.g.,
v1.34.0). - Control Plane Replicas:
1— Development2(High Availability) — Recommended for production3— Maximum redundancy
- External IP Network Type:
- Cloud (recommended) — API accessible via shared gateway using TLS passthrough. No dedicated public IP consumed.
- Public — Dedicated public IP exposed directly to the internet. Use only when direct IP access is required.
- Expose API endpoint externally (via TLSRoute) — Check this to make the API reachable from outside the cluster network (e.g.,
https://dev-cp-shalb-jumbolot.kube-dc.cloud:443).
Step 2: Datastore Configuration
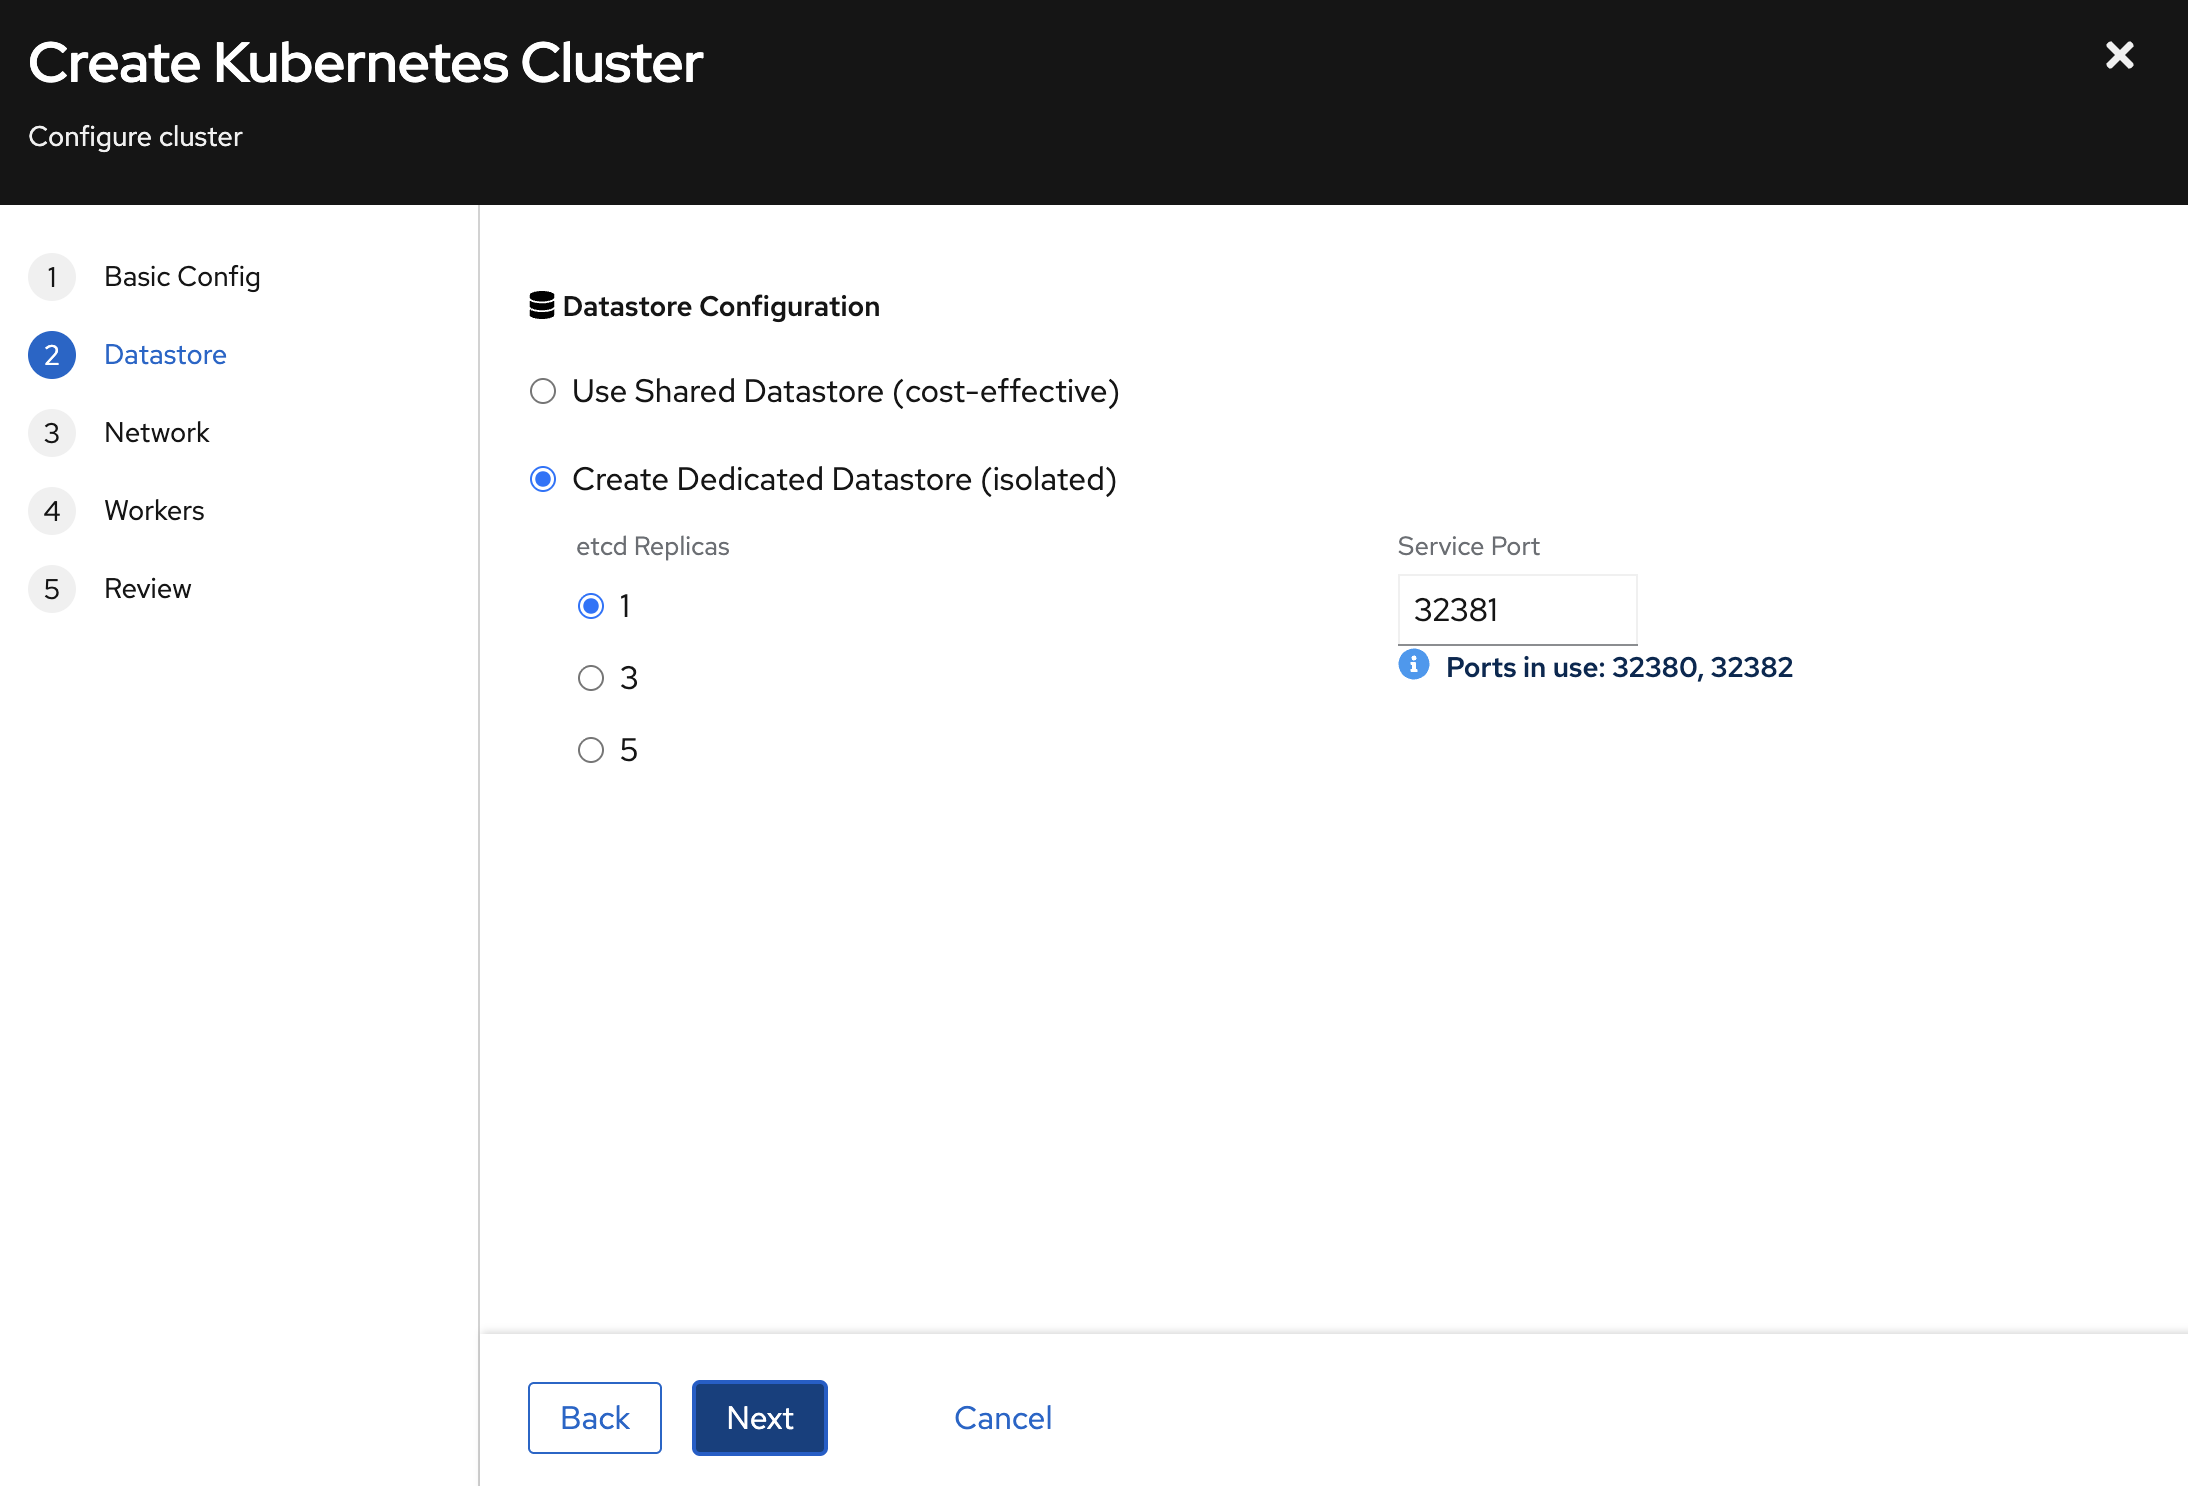
Choose how your cluster's etcd state is stored:
| Mode | Description | Best For |
|---|---|---|
| Shared Datastore (cost-effective) | Multiple clusters share one etcd, each on a different port | Development, staging |
| Dedicated Datastore (isolated) | Your cluster gets its own etcd | Production workloads |
For dedicated datastores:
- etcd Replicas —
1for dev,3for production HA,5for maximum redundancy. - Service Port — A unique port on the shared EIP. The UI shows ports already in use to avoid conflicts.
Step 3: Network & Addons
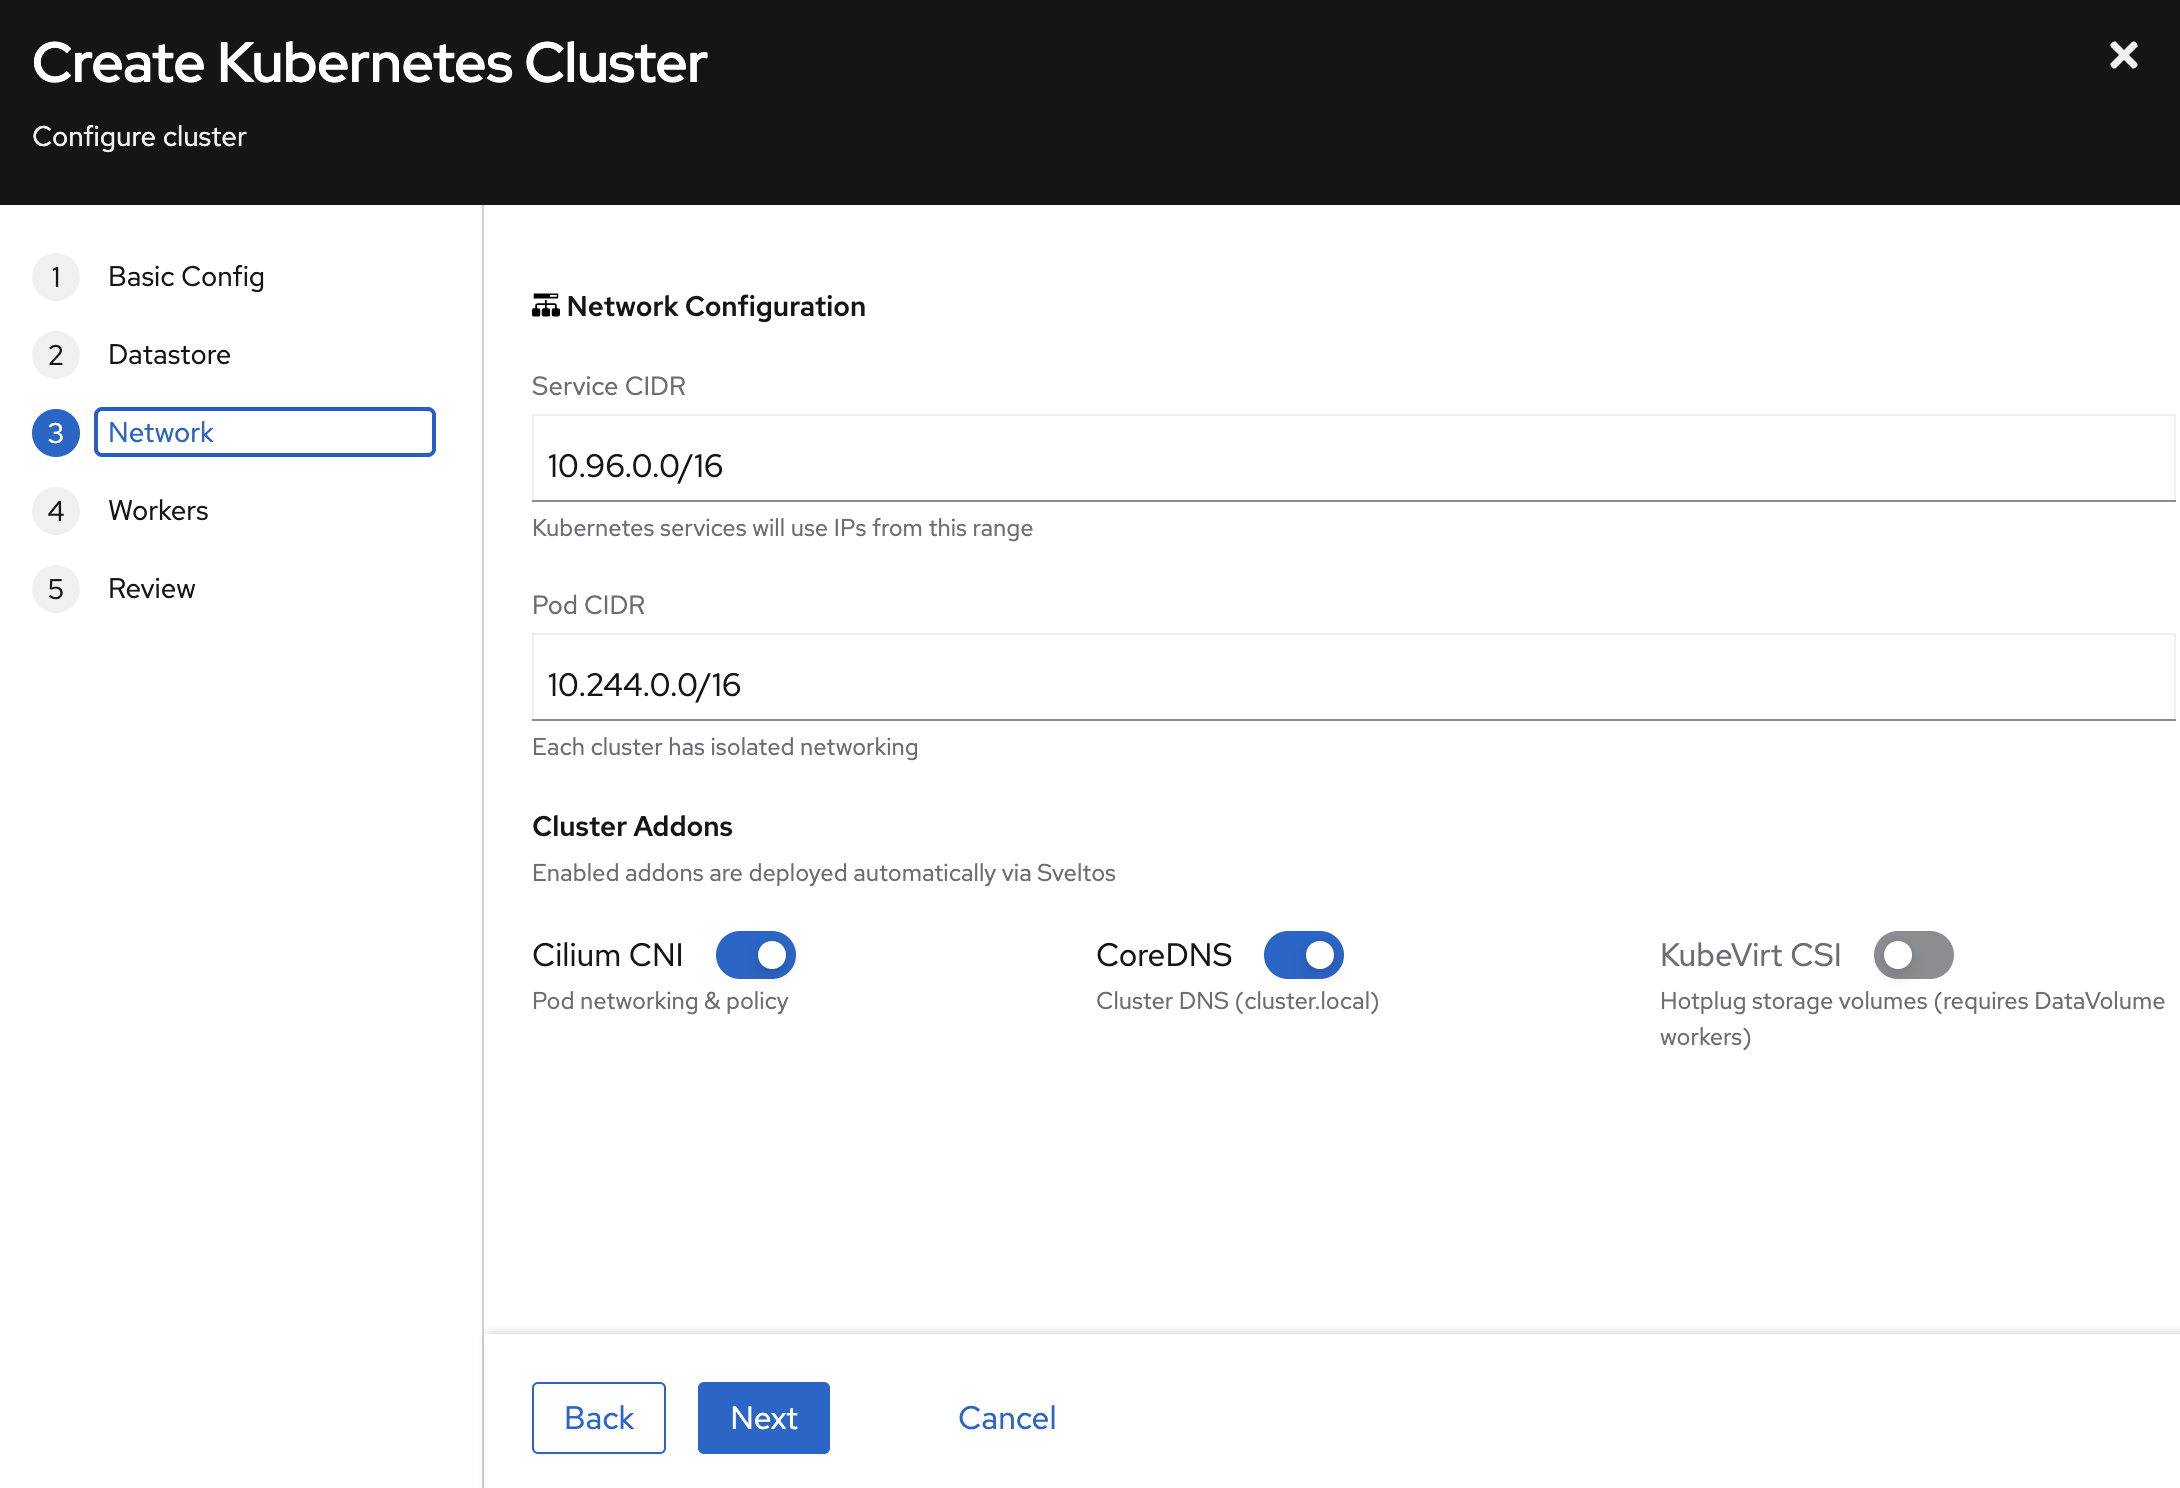
- Service CIDR — IP range for Kubernetes Services (default:
10.96.0.0/16). Each cluster has isolated networking. - Pod CIDR — IP range for Pods (default:
10.244.0.0/16).
Cluster Addons deployed automatically:
| Addon | Description | Recommended |
|---|---|---|
| Cilium CNI | Pod networking and network policy | Yes (required) |
| CoreDNS | Cluster DNS (cluster.local) | Yes (required) |
| KubeVirt CSI | Persistent storage via hotplug DataVolumes | Enable for stateful workloads |
Step 4: Worker Pools
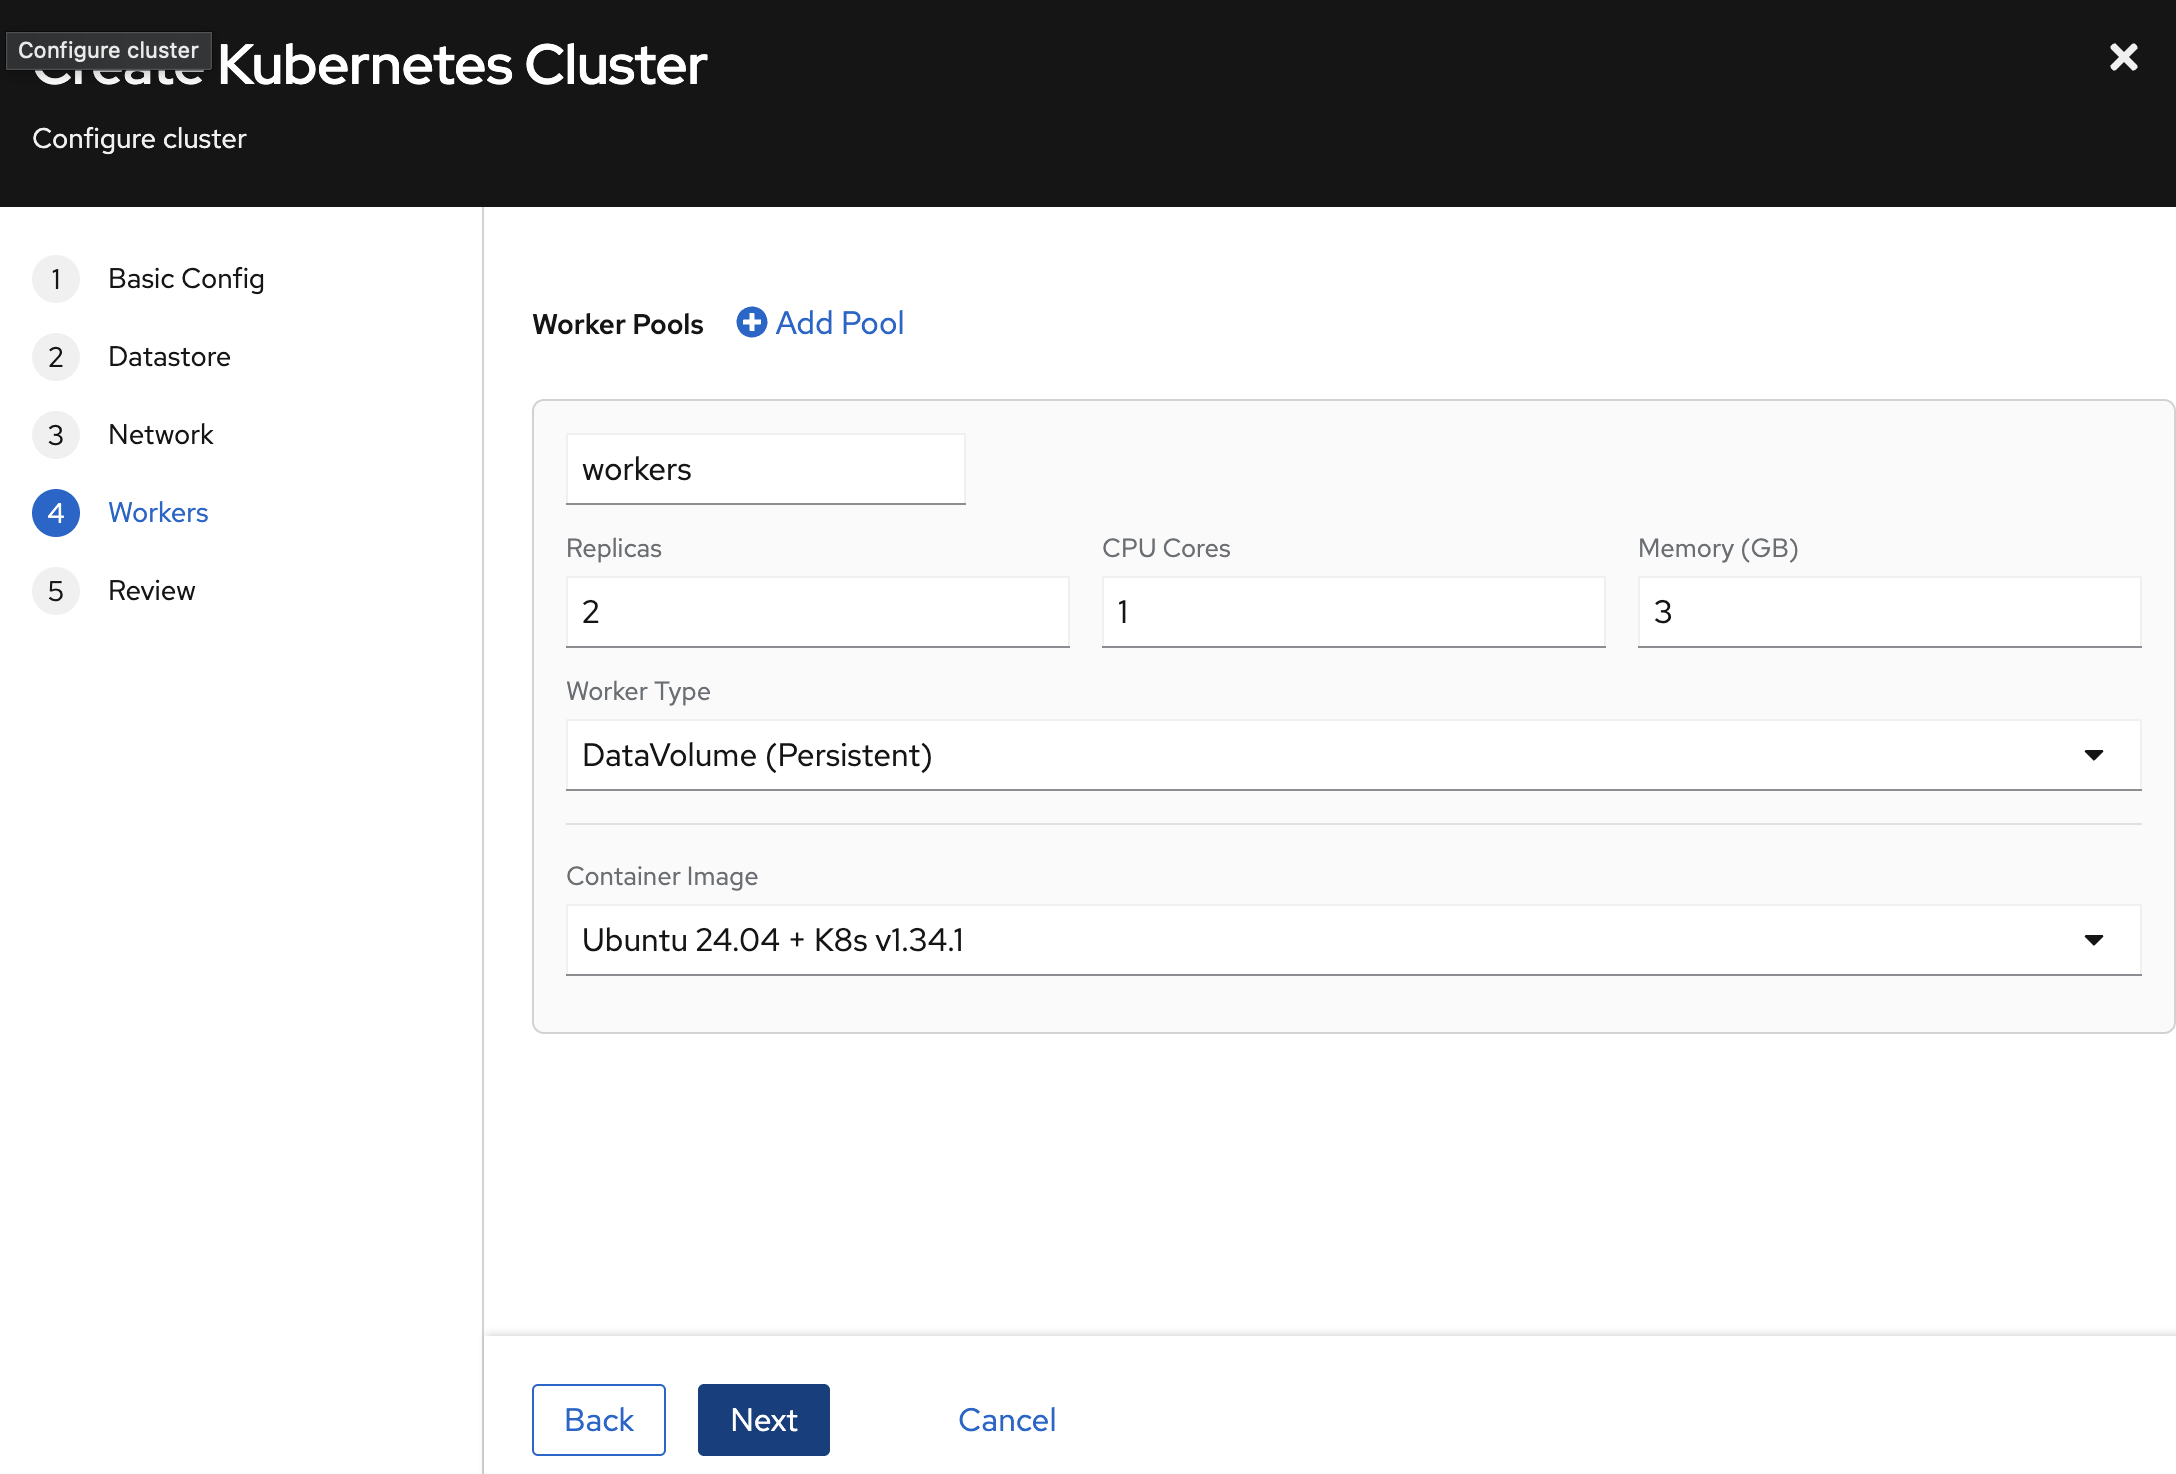
Define one or more worker pools — each a group of identically configured VMs:
- Pool Name — Identifier (e.g.,
workers). - Replicas — Number of worker VMs.
- CPU Cores / Memory (GB) — Resources per worker.
- Worker Type —
DataVolume (Persistent)provides root disks that survive VM restarts. - Container Image — OS image for worker VMs (e.g.,
Ubuntu 24.04 + K8s v1.34.1).
Click + Add Pool to add pools with different configurations (e.g., a general pool and a high-memory pool).
Step 5: Review and Create
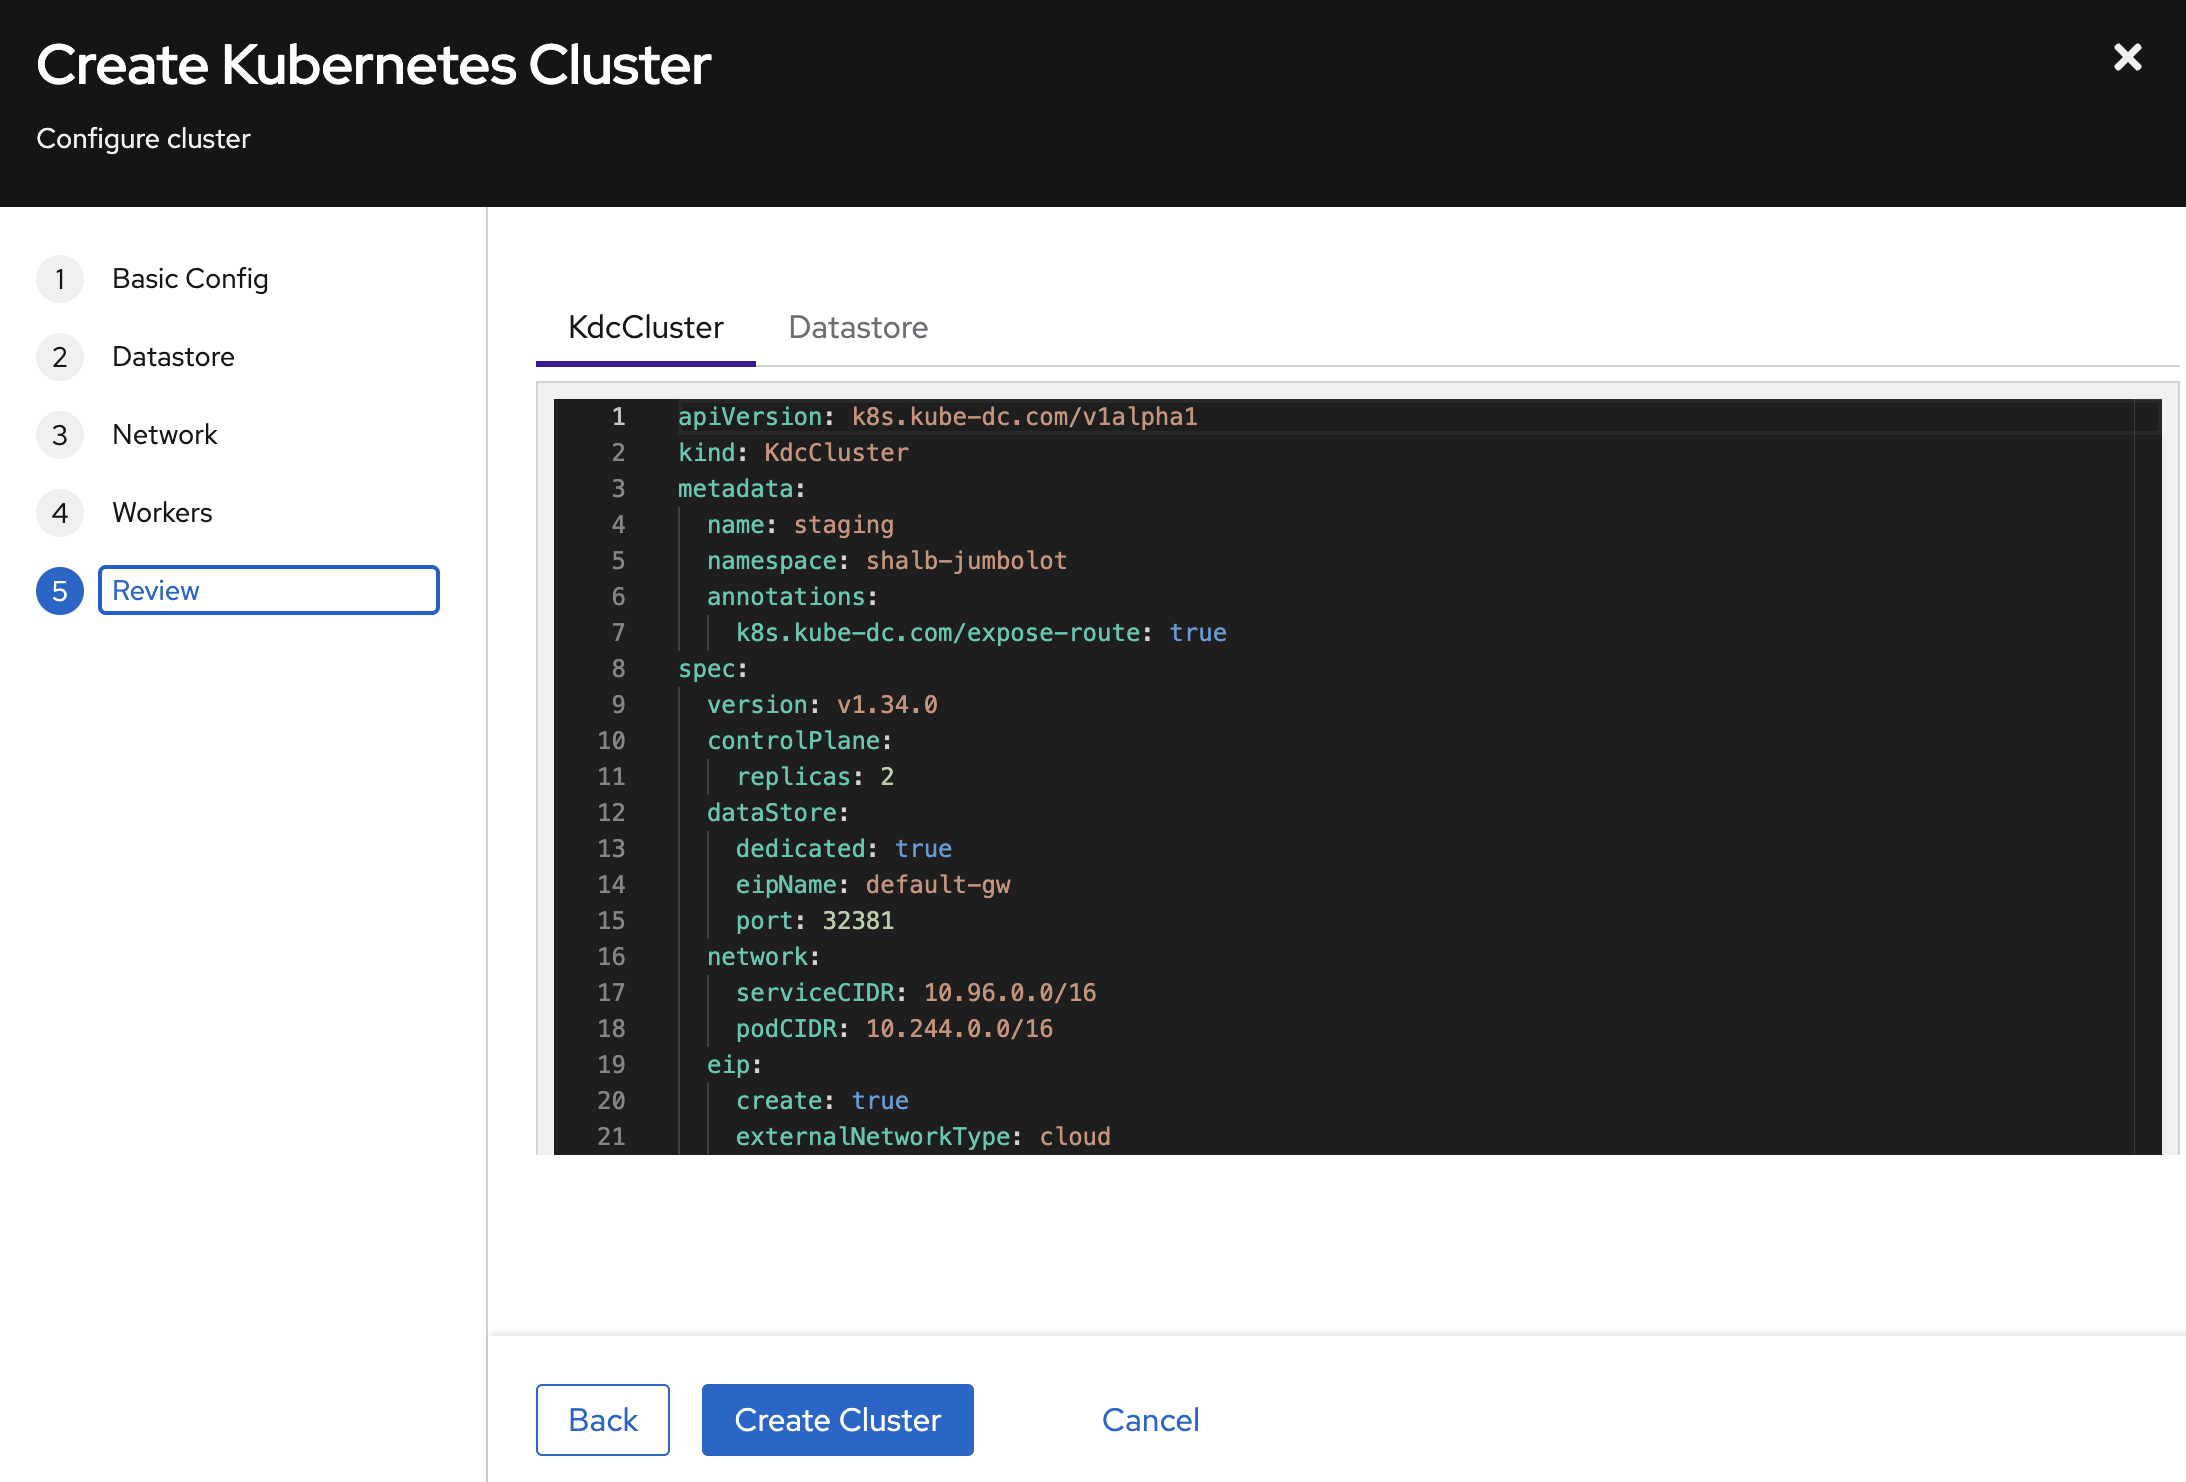
The Review step shows the exact YAML manifests that will be applied. Inspect both the KdcCluster and Datastore tabs to verify the configuration.
Click Create Cluster to start provisioning.
Create a Cluster via kubectl
Apply a KdcCluster resource to your project namespace:
apiVersion: k8s.kube-dc.com/v1alpha1
kind: KdcCluster
metadata:
  name: dev
  namespace: my-project
  annotations:
    k8s.kube-dc.com/expose-route: "true"
spec:
  version: v1.34.0
  controlPlane:
    replicas: 1
  dataStore:
    dedicated: true
    eipName: default-gw
    port: 32381
  network:
    serviceCIDR: 10.96.0.0/16
    podCIDR: 10.244.0.0/16
  eip:
    create: true
    externalNetworkType: cloud
  enableClusterAPI: true
  workers:
    - name: workers
      replicas: 3
      cpuCores: 2
      memory: 8Gi
      diskSize: 30Gi
      image: docker.io/shalb/ubuntu-2404-container-disk:v1.35.2
      architecture: amd64
      infrastructureProvider: kubevirt
      storageType: datavolume
kubectl apply -f cluster.yaml
Spec Reference
| Field | Description | Default |
|---|---|---|
spec.version | Kubernetes version | Required |
spec.controlPlane.replicas | API server replicas (1–5) | 2 |
spec.dataStore.dedicated | Create dedicated etcd | false |
spec.dataStore.eipName | EIP for datastore LoadBalancer | default-gw |
spec.dataStore.port | Port on shared EIP (must be unique per cluster) | 2379 |
spec.network.serviceCIDR | Kubernetes service CIDR | 10.96.0.0/12 |
spec.network.podCIDR | Pod network CIDR | 10.244.0.0/16 |
spec.eip.create | Auto-create EIP for API server | true |
spec.eip.externalNetworkType | cloud or public | cloud |
spec.enableClusterAPI | Enable worker node management | true |
spec.workers[].name | Worker pool name (unique) | Required |
spec.workers[].replicas | Number of workers in pool | Required |
spec.workers[].cpuCores | CPU cores per worker | Required |
spec.workers[].memory | Memory per worker (e.g., 4Gi) | Required |
spec.workers[].image | Container disk image for workers | Required |
spec.workers[].storageType | datavolume (persistent) or empty (ephemeral) | — |
spec.workers[].infrastructureProvider | kubevirt or cloudsigma | kubevirt |
spec.encryption.etcd.enabled | Encrypt Secret + ConfigMap values at rest in the cluster's etcd (KMS v2 envelope via OpenBao Transit) — see Encryption at Rest | false |
spec.encryption.etcd.kekRotation.enabled | Auto-rotate the Key Encryption Key on a schedule | false |
spec.encryption.etcd.kekRotation.interval | Duration between rotations (units: d, h, m, s — w is not accepted). Must be ≥ 7d and ≥ spec.backup.retentionDays. | — |
Annotations
| Annotation | Description |
|---|---|
k8s.kube-dc.com/expose-route: "true" | Expose API endpoint externally via TLSRoute (recommended for cloud network type) |
kube-dc.com/restore-from | S3 key of a prior backup to restore on first boot. Plaintext .db keys and envelope directories (trailing slash) are both auto-detected. See Backups & Snapshots. |
Encryption at Rest
Your cluster's etcd stores everything kubectl returns — Secrets,
ConfigMaps, CRDs, ServiceAccount tokens. By default these are written
to disk in plaintext. Flipping a single field encrypts them with
KMS v2 envelope encryption: each row gets a fresh AES-256-GCM data
key (DEK), and the DEK is wrapped by a per-cluster Key Encryption Key
(KEK) that lives in Kube-DC's OpenBao Transit engine and never leaves
in plaintext.
spec:
  encryption:
    etcd:
      enabled: true
That single toggle gets you the §10.1 "simple default" flow: a
per-cluster KMSKey is auto-created, the apiserver starts with a KMS
plugin sidecar, and every new Secret you create from that point on is
stored encrypted. Existing Secrets re-encrypt on next write — to
force them all to re-encrypt immediately, do kubectl get secret -A -o yaml | kubectl replace --force -f -.
To check it took effect:
kubectl get kdccluster <name> -o jsonpath='{.status.encryption}'
You should see a resolvedKeyRef (the name of the auto-created KMSKey)
and kekRotation.currentVersion: 1.
Rotating the KEK
Encryption-at-rest by itself doesn't rotate the wrapping key — schedule that explicitly:
spec:
  encryption:
    etcd:
      enabled: true
      kekRotation:
        enabled: true
        interval: 90d
Rules:
- Units are
d,h,m,s(now). - Minimum 7 days, maximum 730 days.
- Interval must be ≥
spec.backup.retentionDays * 24h. The rationale: rotating faster than backups age out leaves historic backups bound to key versions you'd have to manage by hand.
Rotation creates a new Transit key version. Old key versions stay alive — historic Secrets and backups remain decryptable indefinitely. Bulk re-wrap of existing rows is not done automatically (each row re-wraps on next Update); a CLI-driven sweep is planned for a future release.
Status:
kubectl get kdccluster <name> -o jsonpath='{.status.encryption.kekRotation}'
# {"currentVersion":2,"enabled":true,"lastRotatedTime":"...","minDecryptionVersion":1,"nextRotationTime":"..."}
Backups stay encrypted too
When encryption.etcd.enabled: true AND spec.backup.enabled: true
(the latter is the default), the per-cluster snapshot CronJob writes
envelope-encrypted snapshots to S3 — three sibling objects per
snapshot instead of one. The detail lives in
Backups & Snapshots; the short version is that
restoring from an encrypted backup needs OpenBao access just like the
live cluster does, so anyone reading the S3 bucket cannot decrypt.
Limits
- What's encrypted:
Secretvalues by default. Opt intoConfigMaptoo viaspec.encryption.etcd.resources: ["secrets", "configmaps"]. Other resources (leases,events,endpoints,pods) stay plaintext for the high-write-rate / low-sensitivity reasons — see the design doc on the public site. - What's NOT encrypted: application data on PVCs. Use a workload- side mechanism (LUKS-backed StorageClass, application encryption, Velero with restic) for that.
- Disabling: flipping
enabled: falseon a cluster that was previously encrypted is intentionally blocked — the apiserver would fail to read existing rows. Contact your cluster admin for the documented two-step migration.
Monitor Cluster Creation
# Watch cluster status
kubectl get kdccluster -n my-project -w

# Example output:
# NAME   VERSION   PHASE   ENDPOINT                                        DATASTORE   AGE
# dev    v1.34.0   Ready   https://dev-cp-my-project.kube-dc.cloud:443     dev-etcd    5m

# Check datastore status
kubectl get kdcclusterdatastores -n my-project

# Example output:
# NAME       READY   DEDICATED   DATASTORE   AGE
# dev-etcd   Ready   true        dev-etcd    5m
Provisioning typically takes 3–5 minutes. The cluster goes through phases: Pending → WaitingForService → Provisioning → Ready.
Access Your Cluster
Via Dashboard
Once the cluster is Ready, click the Kubeconfig button on the cluster detail page to download the kubeconfig file.
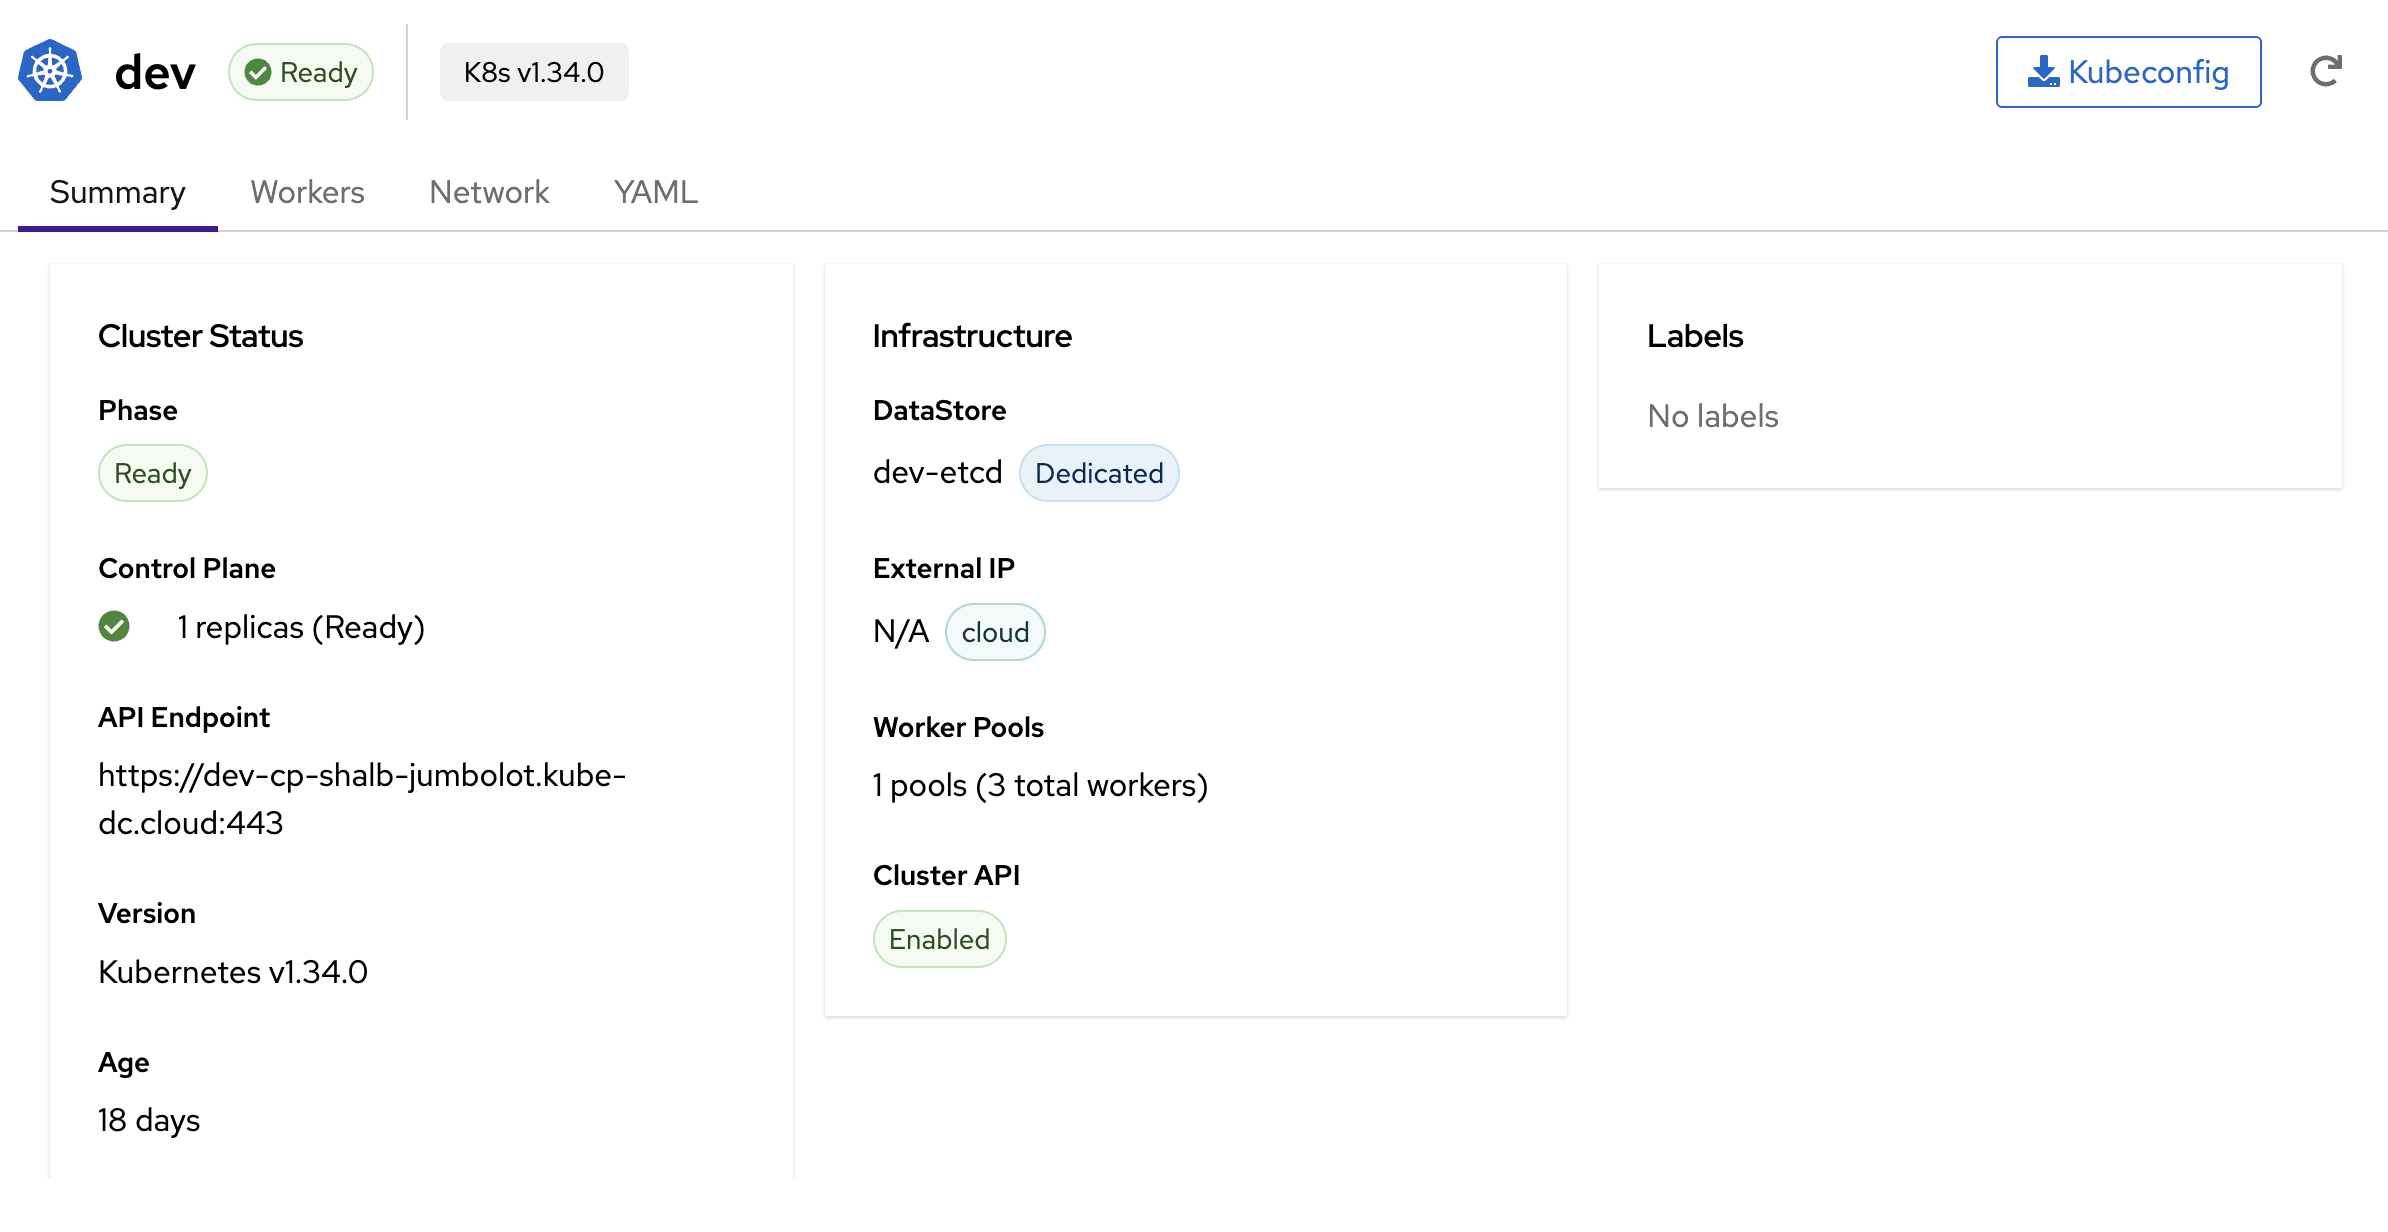
The cluster detail page shows:
- Phase — Current state (Ready)
- Control Plane — Replicas and health status
- API Endpoint — The external URL (e.g.,
https://dev-cp-shalb-jumbolot.kube-dc.cloud:443) - DataStore — etcd name and type (Shared/Dedicated)
- Worker Pools — Number of pools and total workers
- Tabs for Summary, Workers, Network, and YAML views
Via kubectl
# Extract kubeconfig from the admin secret
kubectl get secret dev-cp-admin-kubeconfig -n my-project \
  -o jsonpath='{.data.super-admin\.svc}' | base64 -d > /tmp/dev-kubeconfig

# Verify access to the tenant cluster
kubectl --kubeconfig=/tmp/dev-kubeconfig get nodes
What Gets Created
When you create a KdcCluster, the following resources are provisioned automatically in your project namespace:
| Resource | Name Pattern | Purpose |
|---|---|---|
Service (LoadBalancer) | {cluster}-cp | API server endpoint |
Service (ClusterIP) | {cluster}-cp-ext | External DNS endpoint |
TenantControlPlane | {cluster}-cp | Kamaji control plane pods |
KdcClusterDatastore | {cluster}-etcd | etcd (if dedicated) |
StatefulSet | {cluster}-etcd-etcd | etcd pods |
Service (LoadBalancer) | {cluster}-etcd-etcd-lb | etcd external access |
Cluster (CAPI) | {cluster} | Cluster API cluster object |
MachineDeployment | {cluster}-{pool} | Worker pool VMs |
Deployment | kccm-{cluster} | Cloud Controller Manager |
Example — Services created for a cluster named dev in namespace shalb-jumbolot:
$ kubectl get svc -n shalb-jumbolot | grep dev
dev-cp                  LoadBalancer   10.101.79.219    100.65.0.148   6443/TCP    18d
dev-cp-ext              ClusterIP      None             <none>         6443/TCP    18d
dev-etcd-etcd           ClusterIP      None             <none>         2379/TCP    18d
dev-etcd-etcd-lb        LoadBalancer   10.101.20.207    100.65.0.115   32382/TCP   18d
dev-etcd-etcd-lb-ext    ClusterIP      None             <none>         32382/TCP   18d
Next Steps
- Cluster Management — Exposing services, persistent storage, scaling, and operations
- CLI & Kubeconfig Access