Navigating the Kube-DC Dashboard
The Kube-DC dashboard is your central interface for managing projects, workloads, virtual machines, Kubernetes clusters, and account settings. This guide walks you through the key areas of the UI.
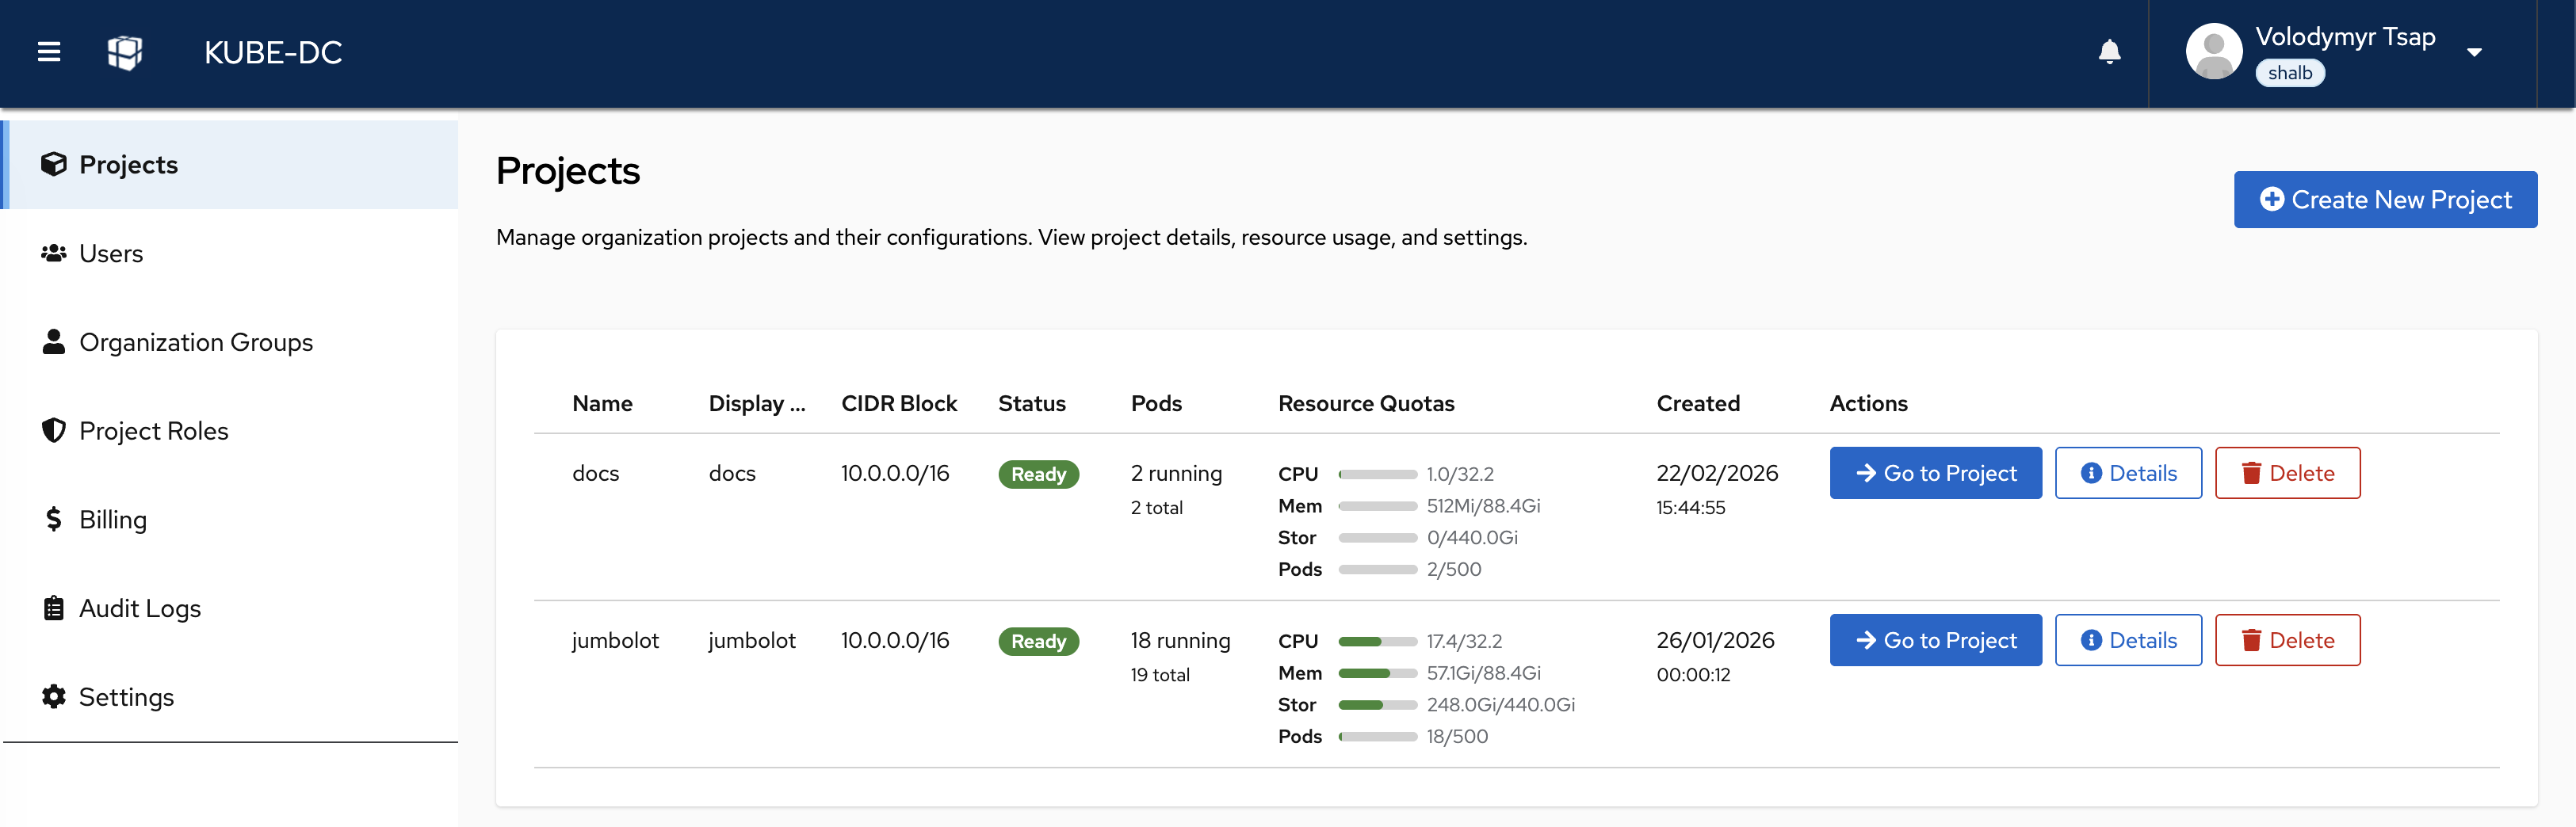
Projects View
After logging in, you land on the Projects page. It lists all projects in your organization along with their status, network CIDR, running pods, resource quotas, and creation date.
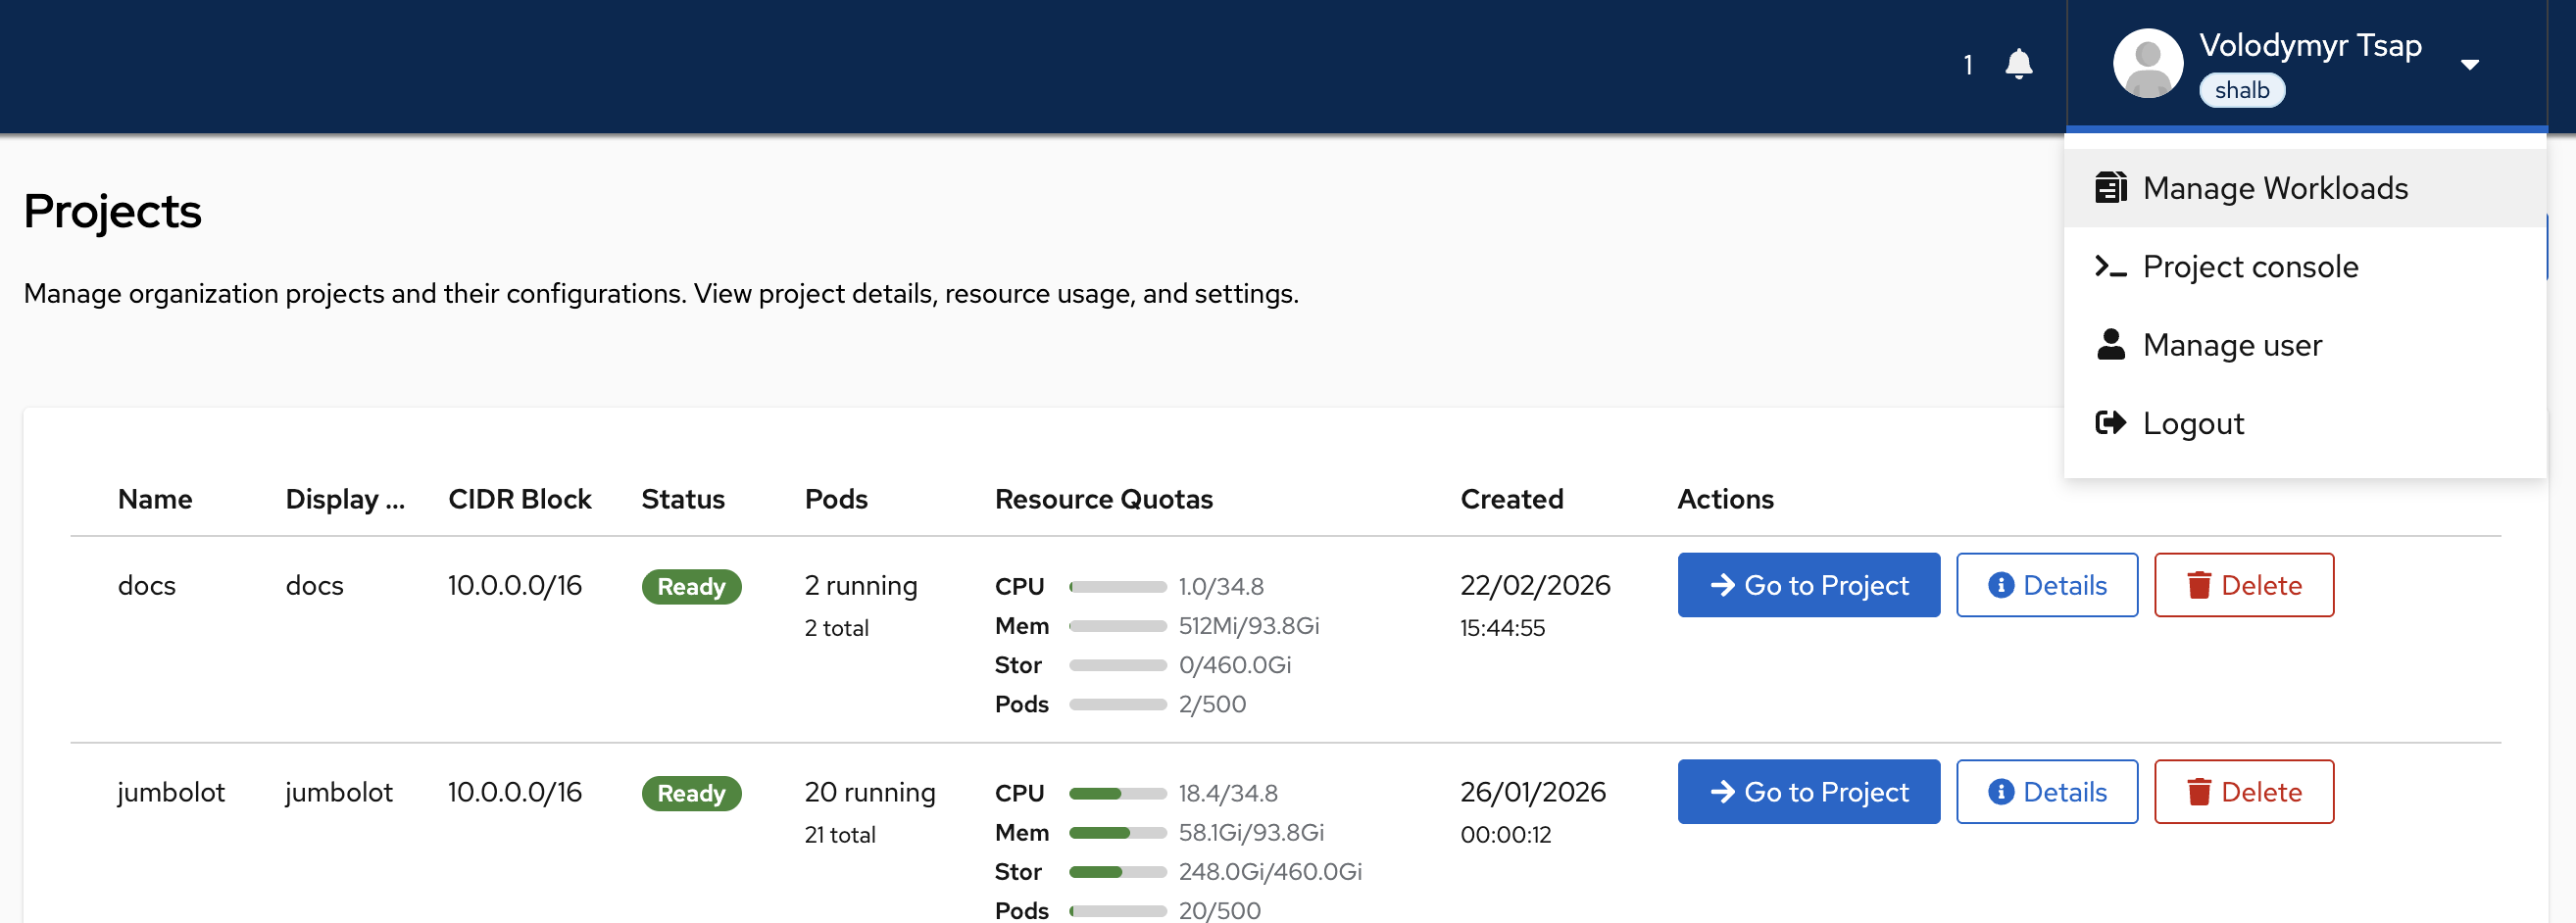
From here you can:
- Go to Project — open the workloads dashboard for a specific project
- Details — view project configuration and resource limits
- Delete — remove a project (requires appropriate permissions)
User Menu
Click your name in the top-right corner to open the user menu with the following options:
| Menu Item | Description |
|---|---|
| Manage Workloads | Open the workloads dashboard for the selected project |
| Project console | Launch a web-based terminal with kubectl access scoped to your projects |
| Manage user | Open account settings (password, 2FA) |
| Logout | Sign out of the dashboard |
Workloads Dashboard
Selecting Manage Workloads or clicking Go to Project takes you to the main workloads dashboard.
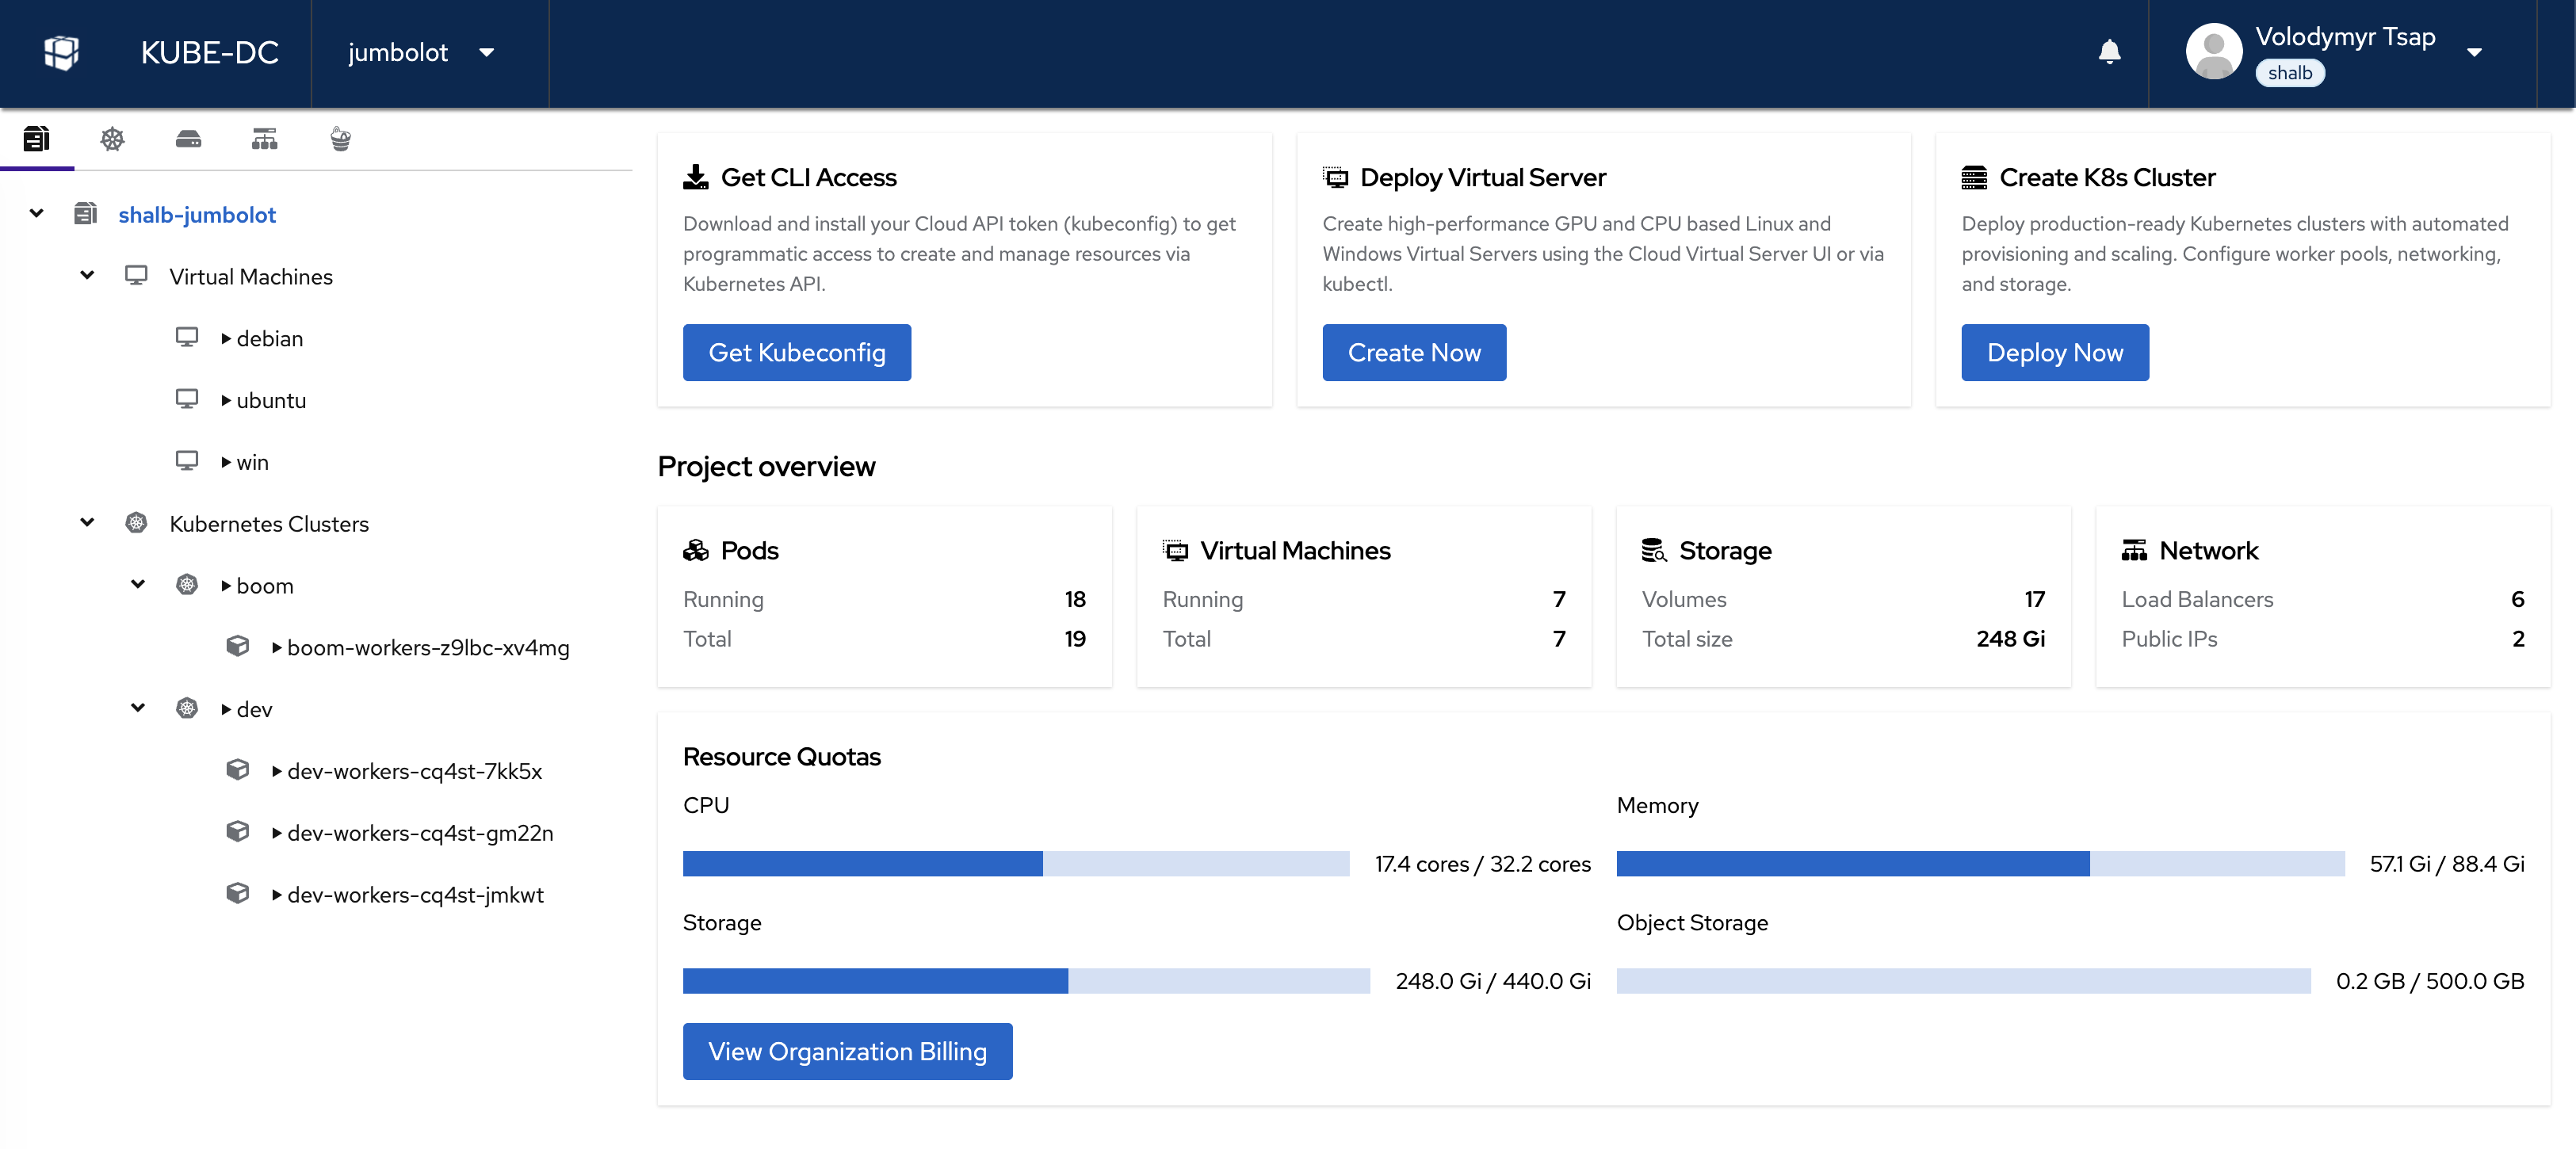
The workloads dashboard provides:
Quick Actions
Three action cards at the top let you jump straight into common tasks:
- Get CLI Access — download your kubeconfig for programmatic access via
kubectl - Deploy Virtual Server — create a new Linux or Windows virtual machine
- Create K8s Cluster — provision a managed Kubernetes cluster with automated scaling
Sidebar Navigation
The left sidebar shows a tree view of all resources in the current project:
- Virtual Machines — grouped by OS (e.g.,
debian,ubuntu,win) - Kubernetes Clusters — nested clusters with their worker nodes
Project Overview
The center panel displays a summary of your project resources:
- Pods — running and total pod count
- Virtual Machines — running and total VM count
- Storage — number of volumes and total size
- Network — load balancers and public IPs in use
Resource Quotas
Progress bars show your current usage against the project limits for:
- CPU — cores used vs. allocated
- Memory — memory used vs. allocated
- Storage — disk space used vs. allocated
- Object Storage — S3-compatible storage used vs. allocated
Click View Organization Billing to see usage and cost details for the entire organization.
Switching Projects
Use the project switcher dropdown at the top of the dashboard (next to the Kube-DC logo) to switch between projects without returning to the projects list.
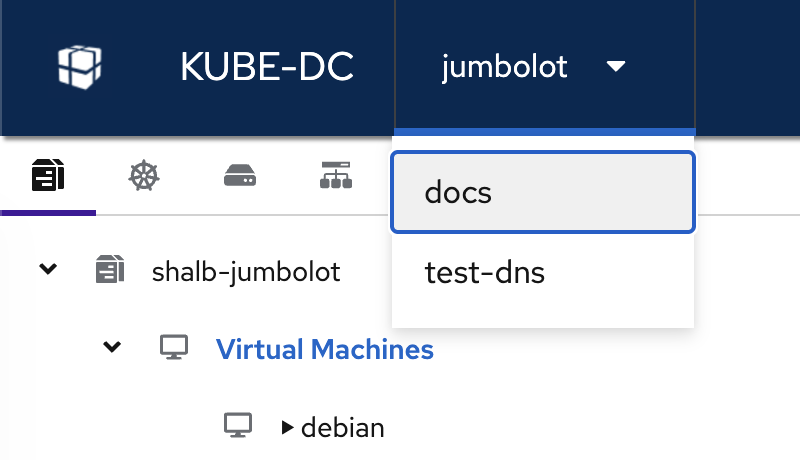
Simply click the current project name and select another project from the dropdown.
Resource Tabs
Below the top navigation bar, a row of icon tabs lets you switch between different resource categories within the current project.
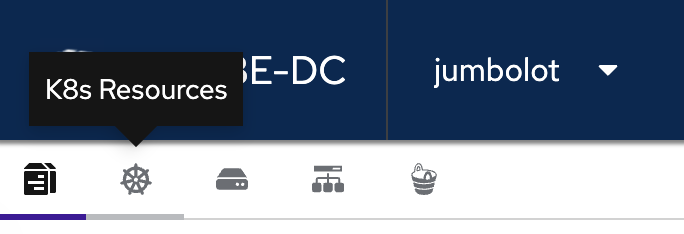
The tabs from left to right are:
| Icon | Resource Category | What You'll Find |
|---|---|---|
| 📋 | Compute | Pods, Deployments, StatefulSets, DaemonSets, Jobs |
| ⚙️ | K8s Resources | ConfigMaps, Secrets, ServiceAccounts, CRDs |
| ☸ | Volumes | PersistentVolumeClaims, storage usage |
| 🖥️ | Network | Services, Ingresses, Load Balancers, IPs |
| 🔗 | Object Storage | S3-compatible buckets and access credentials |
Organization Management
From the Projects page, click the Kube-DC logo in the top-left corner to access the organization management view.
The left sidebar provides access to:
- Projects — create, view, and manage projects
- Users — invite and manage organization members
- Organization Groups — manage user groups and role assignments
- Project Roles — define custom roles for project-level access control
- Billing — view usage, costs, and billing plan details
- Audit Logs — review actions performed across the organization
- Settings — configure organization-level settings
Project Web Console
Select Project console from the user menu to launch a browser-based terminal. The console provides a pre-authenticated kubectl session scoped to the projects in your organization.
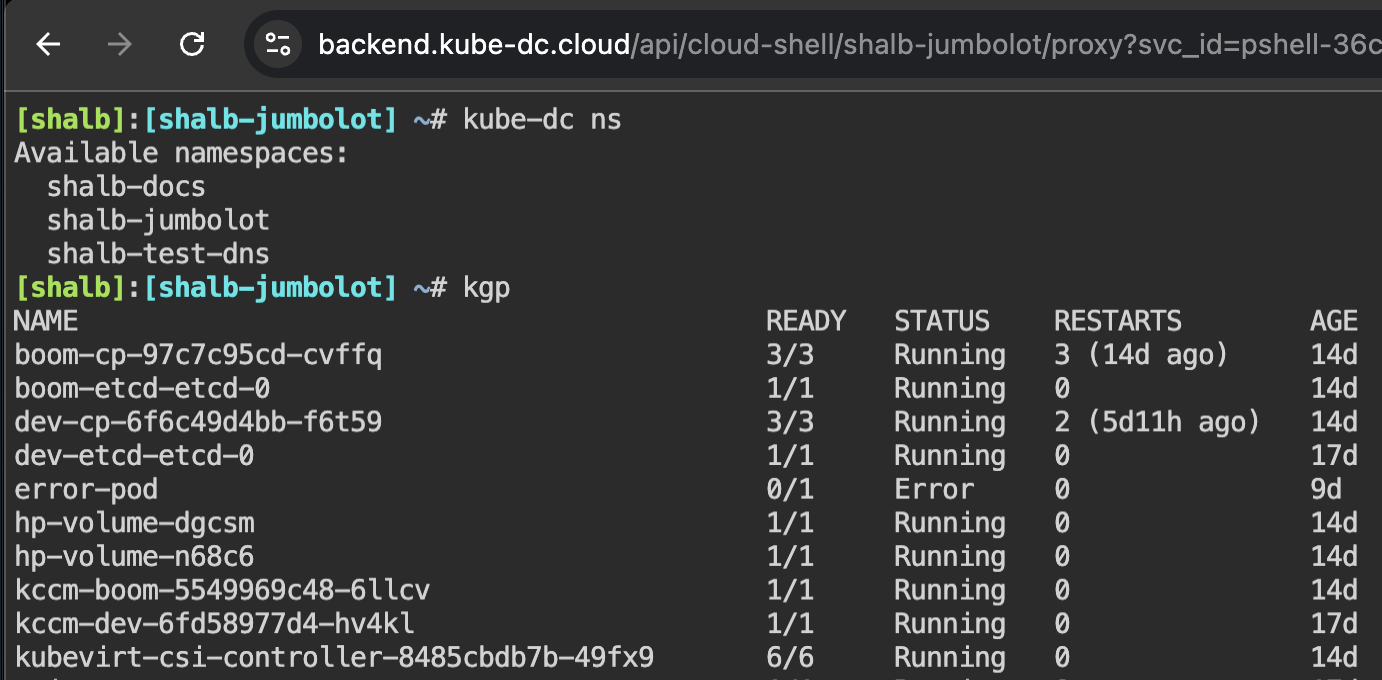
From the console you can:
- List available namespaces with
kube-dc ns - Run
kubectlcommands (aliased askgp,kgs, etc.) - Manage resources directly without installing any CLI tools locally
Account Settings
Select Manage user from the user menu to open your account settings.
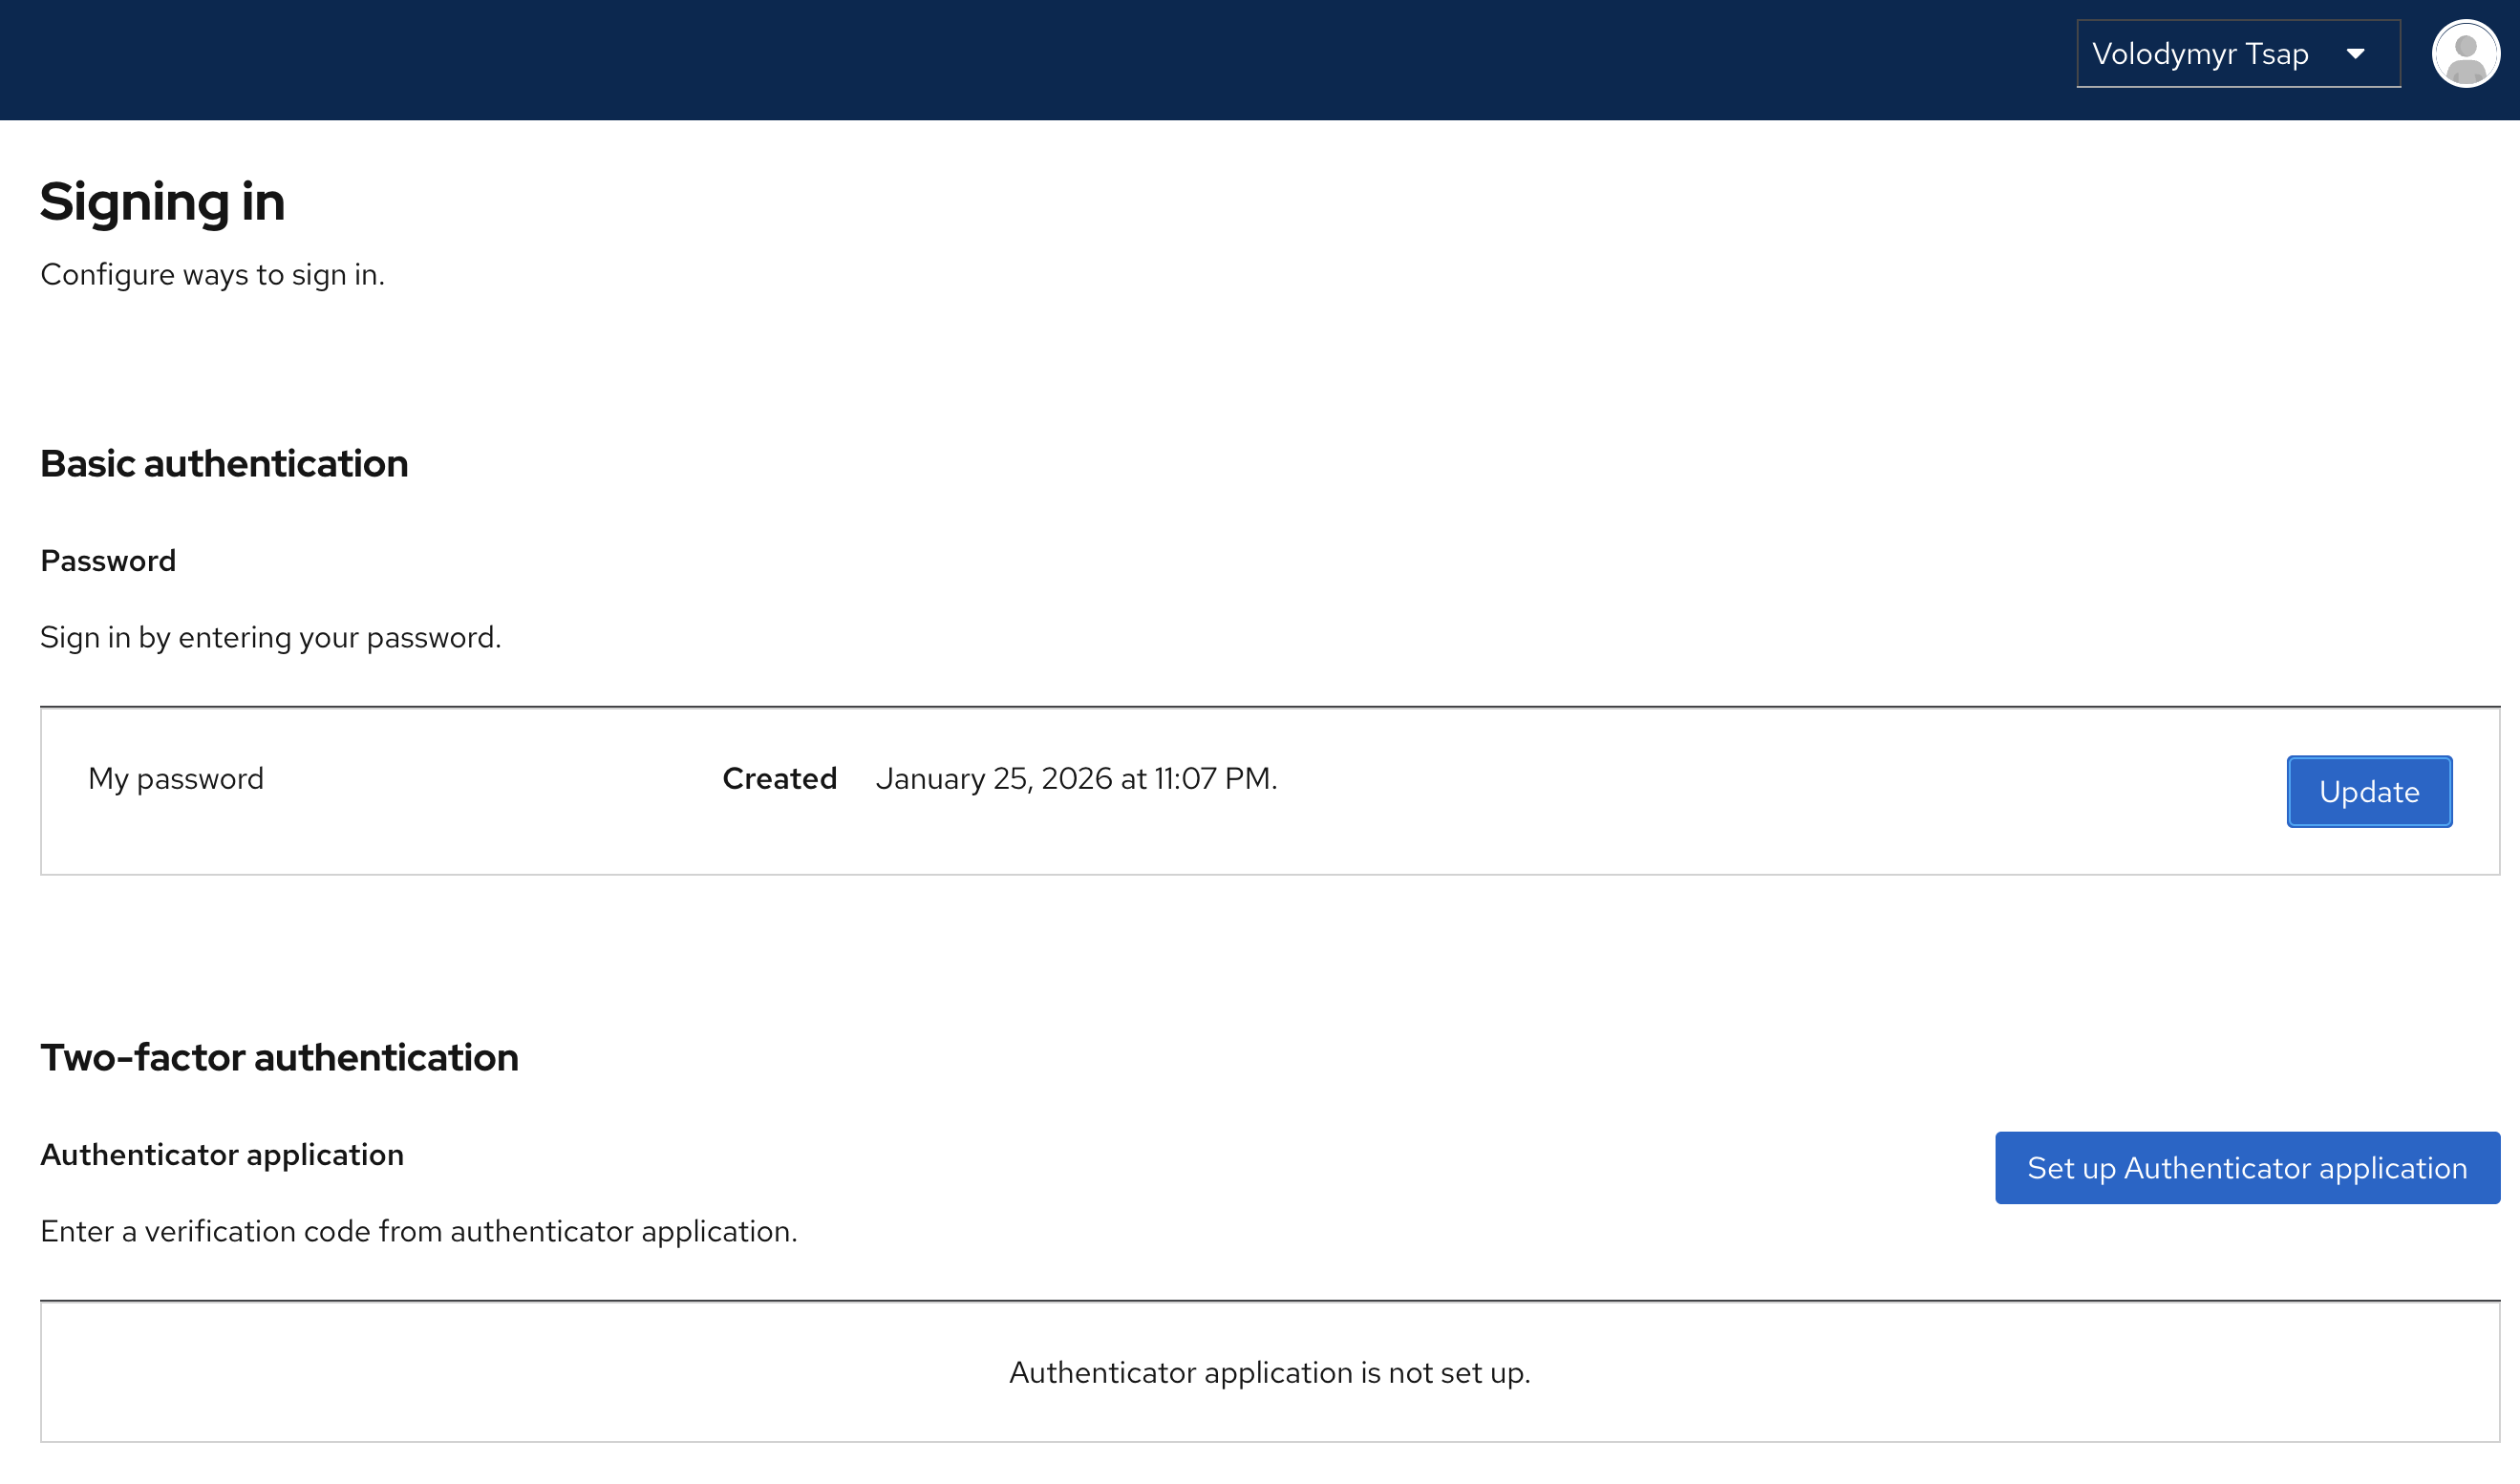
Change Password
Under Basic authentication, click Update next to your password entry to set a new password. The page shows when your current password was created.
Two-Factor Authentication (2FA)
Under Two-factor authentication, click Set up Authenticator application to enable 2FA using an app like Google Authenticator or Authy. Once configured, you will be prompted for a verification code on every login.
Enabling 2FA is strongly recommended to protect your account, especially for organization administrators.
Next Steps
- Core Concepts — understand organizations, projects, and resource isolation
- Creating Your First Project — set up your first project
- CLI & Kubeconfig Access — manage resources from the command line
- Team Management — invite users and assign roles