Deploying VMs & Containers 
This tutorial walks you through deploying virtual machines and containers in Kube-DC. You'll learn both the UI-based approach and how to use kubectl with YAML manifests.
Prerequisites 
Before starting this tutorial, ensure you have:
- Access to a Kube-DC cluster
- The
kubectlcommand-line tool installed - The
virtctlplugin installed for KubeVirt (optional, but recommended) - A project with the necessary permissions to create VMs and containers
Understanding VM Components in Kube-DC 
Kube-DC's virtualization is powered by KubeVirt and consists of several components:
- VirtualMachine (VM): Defines the VM configuration and lifecycle
- DataVolume: Manages the VM's disk image(s)
- VirtualMachineInstance (VMI): Represents a running instance of a VM
Creating a VM Using the Kube-DC UI 
Step 1: Navigate to VM Creation 
- Log in to the Kube-DC dashboard
- Select your project from the dropdown menu (e.g., "demo")
- Navigate to "Virtual Machines" in the left sidebar
- Click the "+" button to create a new VM

Step 2: Configure Basic VM Parameters 
In the VM creation wizard, specify the basic parameters:
- VM Name: Enter a name for your VM (e.g., "new-vm-name")
- Operation System: Select from the dropdown (e.g., "Ubuntu 24.04")
- Advanced Options: Expand this section if you want to customize the image source
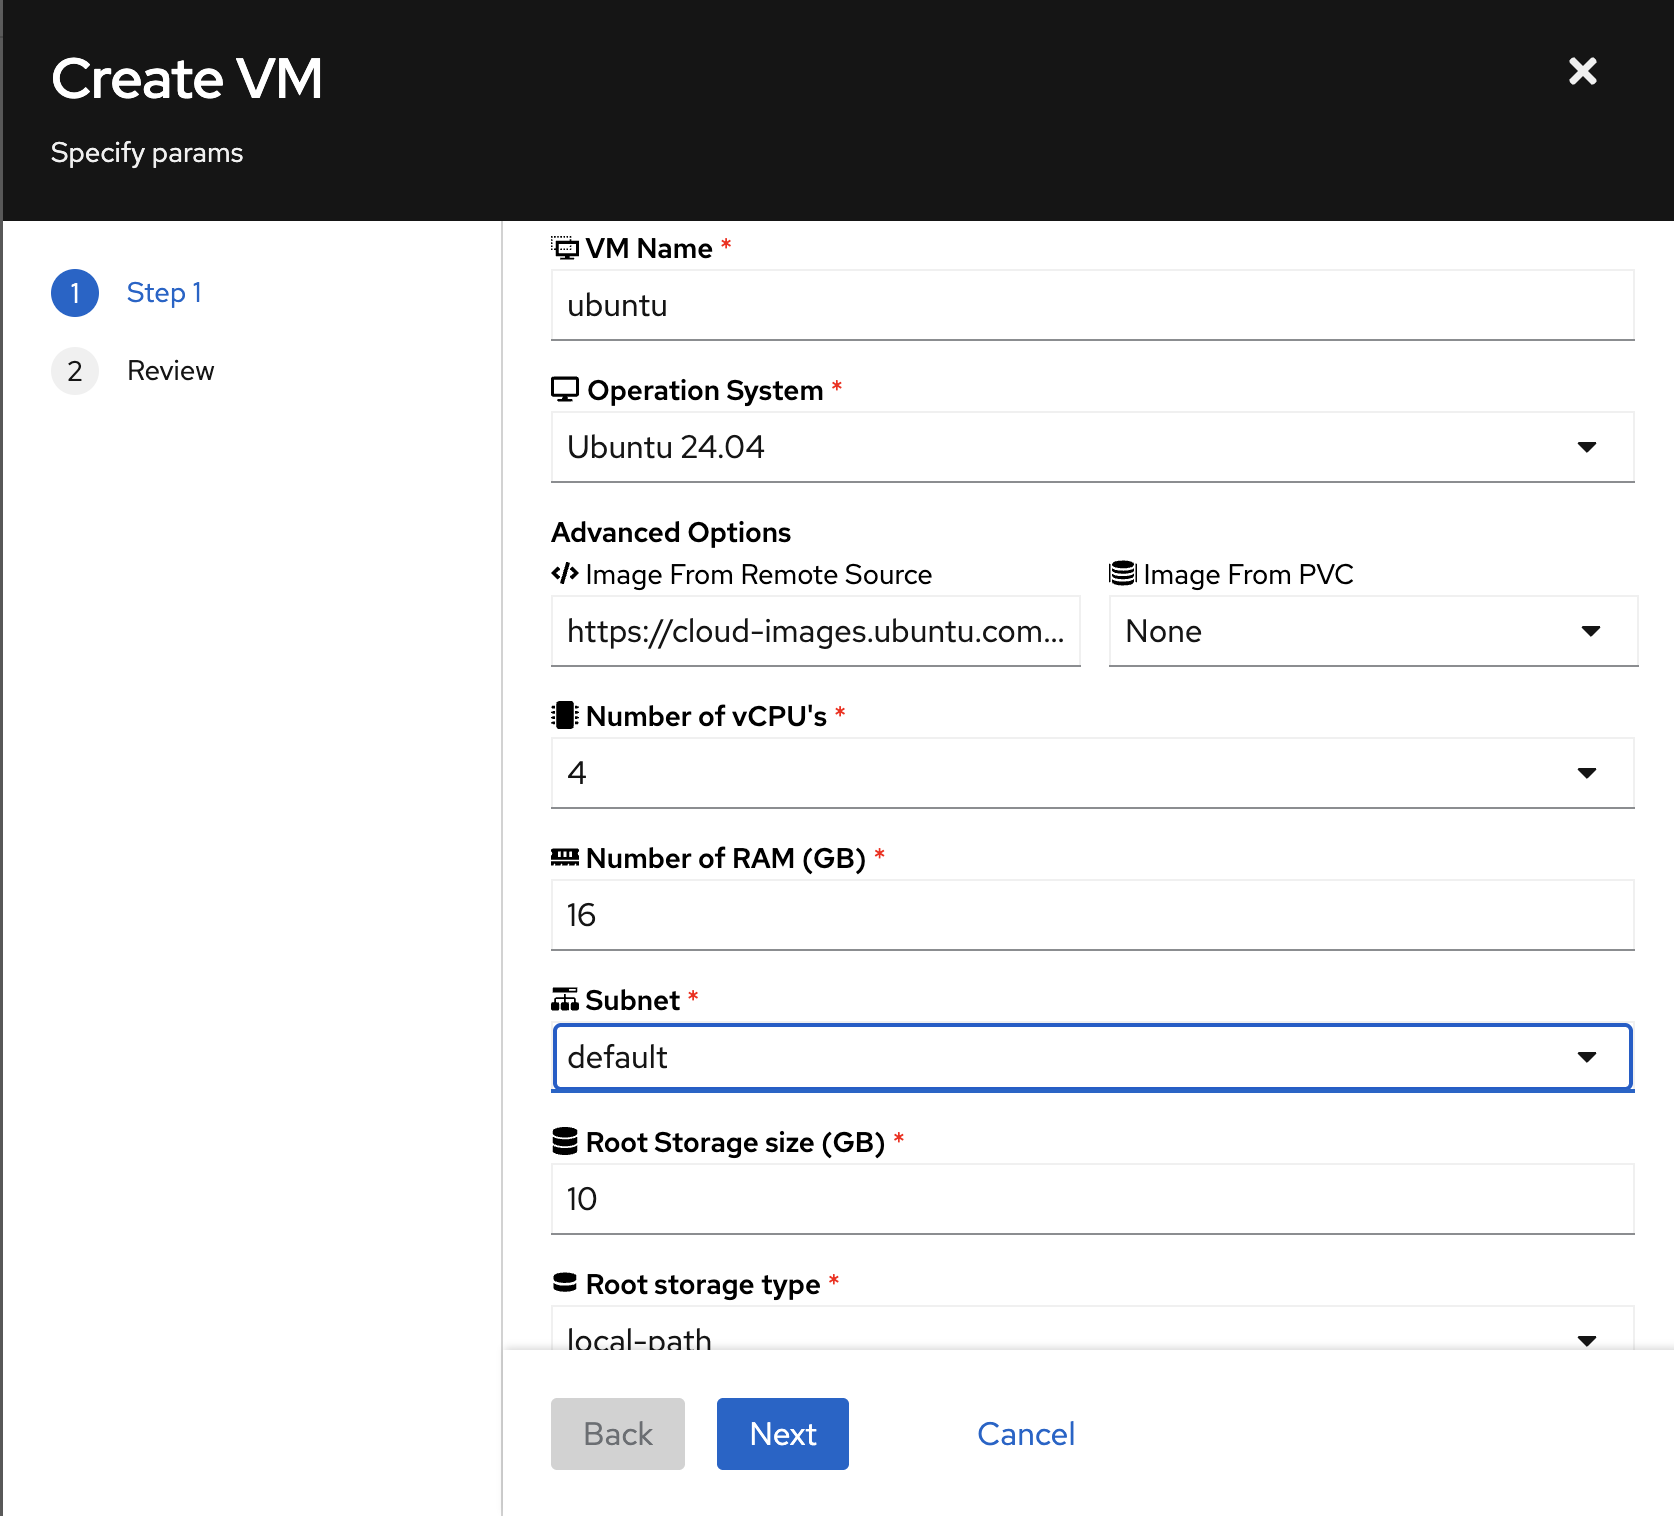
Step 3: Configure VM Resources 
Continue configuring the VM:
- Number of vCPUs: Select the number of virtual CPUs
- RAM (GB): Specify the amount of memory
- Subnet: Choose the network for your VM
- Root Storage Size (GB): Set the disk size
- Root Storage Type: Select the storage class
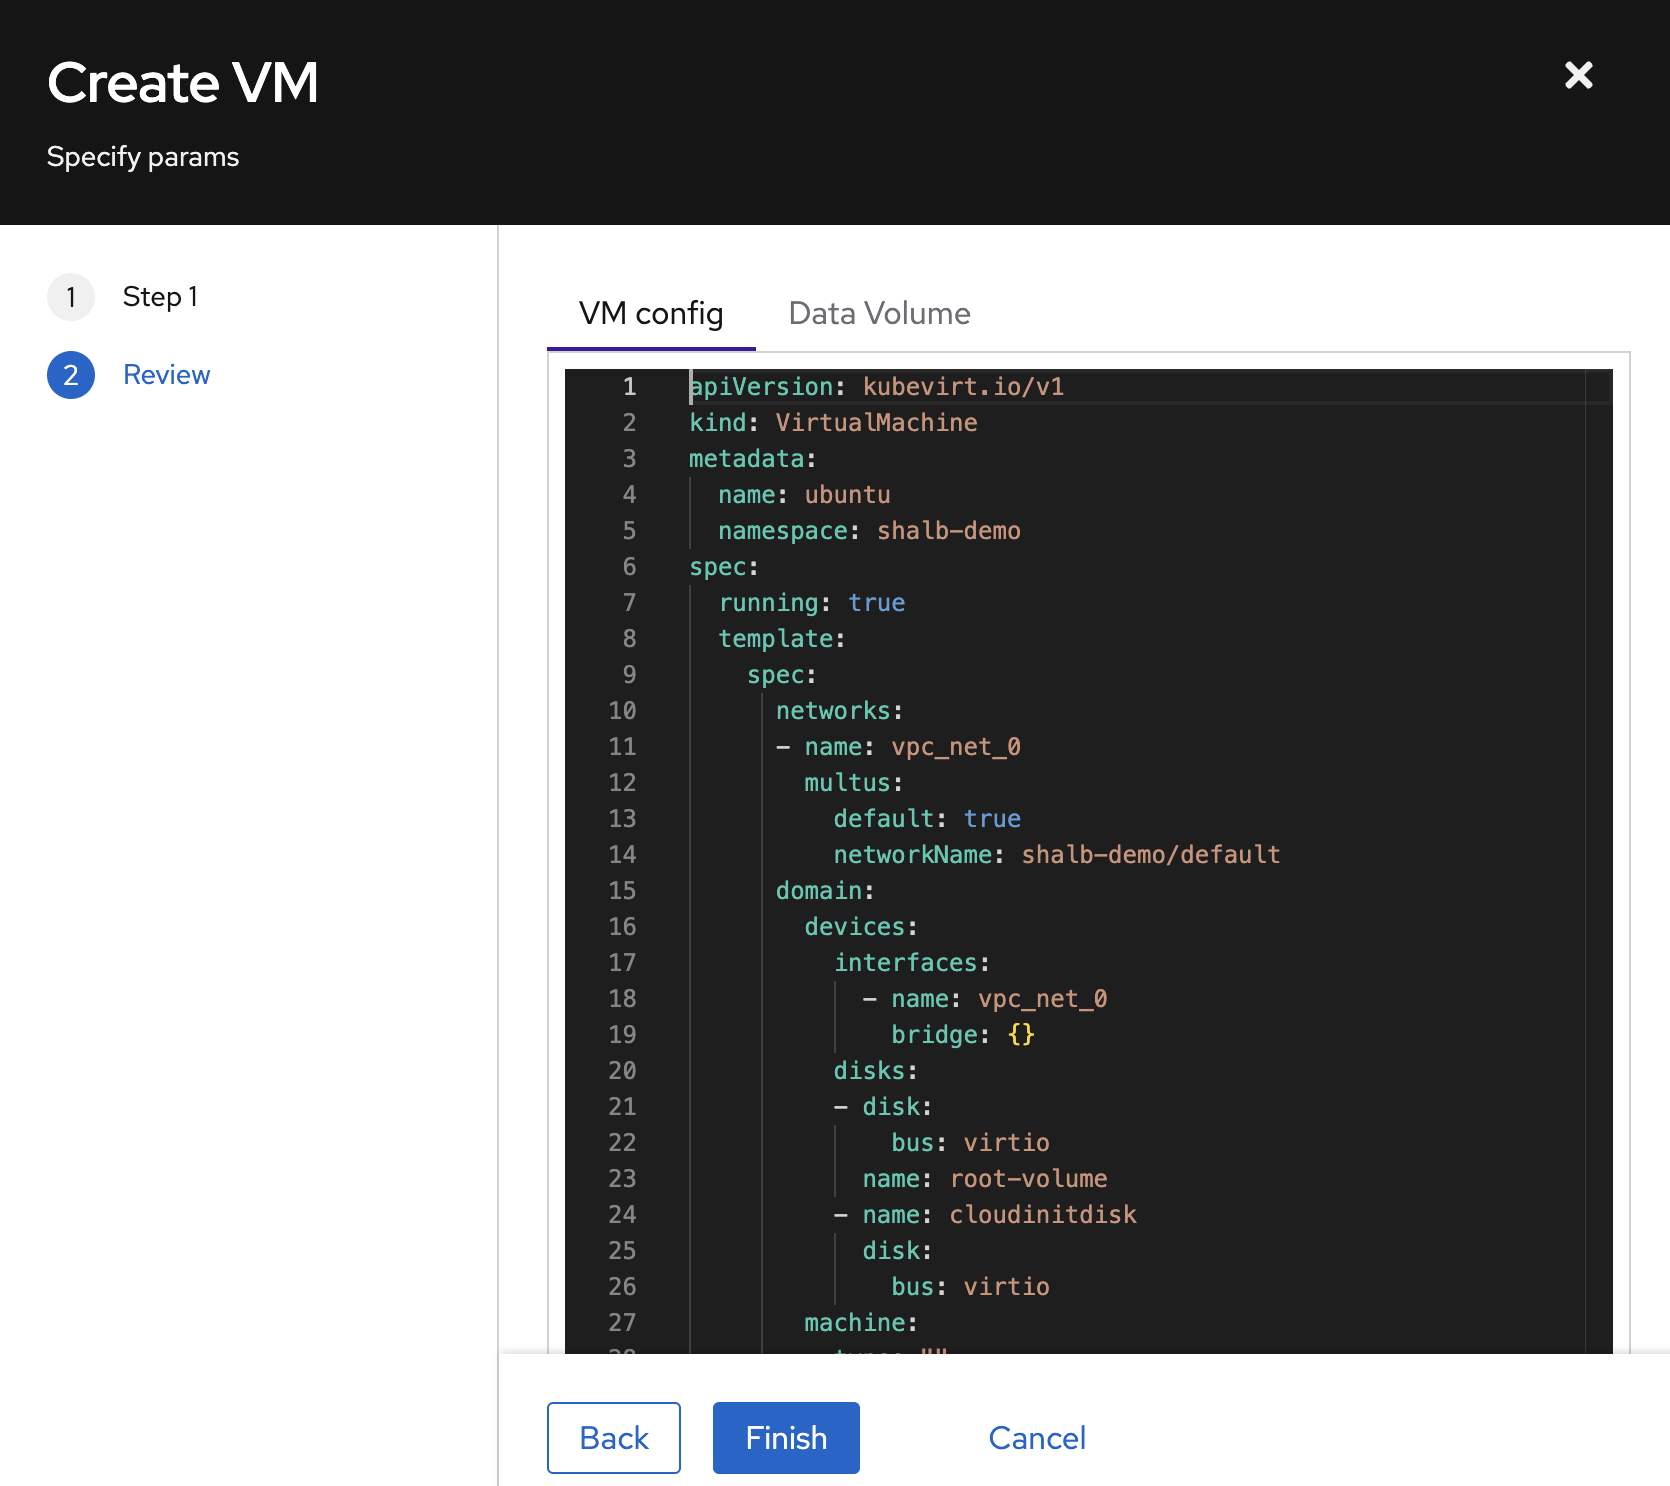
Step 4: Review and Create 
- Click "Next" to proceed to the review page
- Review the generated VM configuration
- The UI shows the actual YAML that will be applied
- Click "Finish" to create the VM
Step 5: Monitor VM Creation 
After creation:
- You'll be redirected to the VM list
- Wait for the VM to reach "Running" state
- Note the assigned IP address
Managing VMs via the UI 
Viewing VM Details 
Click on a VM name to view its details page, which includes:
- Guest OS: Information about the operating system
- VM Details: Status, VPC subnet, and node placement
- Performance Metrics: Real-time CPU, memory, and storage usage
- Conditions: Agent connection and other status indicators

Accessing VM Console 
From the VM details page, you have two options:
- Launch Remote Console: Opens a graphical console in your browser
- Launch SSH Terminal: Opens a web-based SSH terminal
These options provide direct access to your VM without requiring SSH client configuration.
VM Actions 
The UI supports common VM management actions:
- Start/Stop: Control the VM power state
- Restart: Reboot the VM
- Delete: Remove the VM and its resources
- Configure: Modify VM settings
Creating a VM Using kubectl Manifests 
For automation or GitOps workflows, you can create VMs using kubectl and YAML manifests.
Step 1: Create DataVolume 
First, create a DataVolume to serve as the VM's disk:
apiVersion: cdi.kubevirt.io/v1beta1
kind: DataVolume
metadata:
  name: ubuntu-vm-disk
  namespace: shalb-demo
spec:
  pvc:
    accessModes:
    - ReadWriteOnce
    resources:
      requests:
        storage: 10G
    storageClassName: local-path
  source:
    http:
      url: https://cloud-images.ubuntu.com/noble/current/noble-server-cloudimg-amd64.img
Apply this manifest:
Step 2: Create the VM Definition 
Create a VM manifest:
apiVersion: kubevirt.io/v1
kind: VirtualMachine
metadata:
  name: ubuntu-vm
  namespace: shalb-demo
spec:
  running: true
  template:
    spec:
      networks:
      - name: vpc_net_0
        multus:
          default: true
          networkName: shalb-demo/default
      domain:
        devices:
          interfaces:
            - name: vpc_net_0
              bridge: {}
          disks:
          - disk:
              bus: virtio
            name: root-volume
          - name: cloudinitdisk
            disk:
              bus: virtio
        cpu:
          cores: 2
        memory:
          guest: 4G
      volumes:
      - dataVolume:
          name: ubuntu-vm-disk
        name: root-volume
      - name: cloudinitdisk
        cloudInitNoCloud:
          userData: |-
            #cloud-config
            chpasswd: { expire: False }
            password: temppassword
            ssh_pwauth: True
            package_update: true
            package_upgrade: true
            packages:
            - qemu-guest-agent
            runcmd:
            - [ systemctl, enable, qemu-guest-agent ]
            - [ systemctl, start, qemu-guest-agent ]
Apply the VM manifest:
Step 3: Monitor VM Status 
Check the status of your VM:
VM Examples for Different Operating Systems 
Kube-DC supports various operating systems. Here are examples for the most common ones:
Debian 
apiVersion: cdi.kubevirt.io/v1beta1
kind: DataVolume
metadata:
  name: debian-base-img
spec:
  pvc:
    accessModes:
    - ReadWriteOnce
    resources:
      requests:
        storage: 14G
    storageClassName: local-path
  source:
    http:
      url: https://cloud.debian.org/images/cloud/bookworm/latest/debian-12-generic-amd64.qcow2
---
apiVersion: kubevirt.io/v1
kind: VirtualMachine
metadata:
  name: debian-vm
  namespace: shalb-demo
spec:
  running: true
  template:
    spec:
      networks:
      - name: vpc_net_0
        multus:
          default: true
          networkName: shalb-demo/default
      domain:
        devices:
          interfaces:
            - name: vpc_net_0
              bridge: {}
          disks:
          - disk:
              bus: virtio
            name: root-volume
          - name: cloudinitdisk
            disk:
              bus: virtio
        cpu:
          cores: 1
        memory:
          guest: 2G
      volumes:
      - dataVolume:
          name: debian-base-img
        name: root-volume
      - name: cloudinitdisk
        cloudInitNoCloud:
          userData: |-
            #cloud-config
            chpasswd: { expire: False }
            password: temppassword
            ssh_pwauth: True
            package_update: true
            packages:
            - qemu-guest-agent
            runcmd:
            - [ systemctl, start, qemu-guest-agent ]
Alpine Linux 
apiVersion: cdi.kubevirt.io/v1beta1
kind: DataVolume
metadata:
  name: alpine-base-img
spec:
  pvc:
    accessModes:
    - ReadWriteOnce
    resources:
      requests:
        storage: 2G
    storageClassName: local-path
  source:
    http:
      url: https://dl-cdn.alpinelinux.org/alpine/v3.19/releases/cloud/nocloud_alpine-3.19.1-x86_64-bios-cloudinit-r0.qcow2
CentOS Stream 9 
apiVersion: cdi.kubevirt.io/v1beta1
kind: DataVolume
metadata:
  name: centos-base-img
spec:
  pvc:
    accessModes:
    - ReadWriteOnce
    resources:
      requests:
        storage: 10G
    storageClassName: local-path
  source:
    http:
      url: https://cloud.centos.org/centos/9-stream/x86_64/images/CentOS-Stream-GenericCloud-9-latest.x86_64.qcow2
Note: CentOS Stream 9 requires additional SELinux configuration to enable guest agent SSH key injection. The OS configuration includes proper SELinux booleans and contexts to allow guest agent operations. See the CentOS example in examples/virtual-machine/centos-8.yaml for the complete cloud-init configuration with SELinux setup.
Virtual Machine Health Checks 
Kube-DC supports VM health checks to ensure your VMs are running properly:
spec:
  template:
    spec:
      readinessProbe:
        guestAgentPing: {}
        failureThreshold: 10
        initialDelaySeconds: 20
        periodSeconds: 10
        timeoutSeconds: 5
      livenessProbe:
        failureThreshold: 10
        initialDelaySeconds: 120
        periodSeconds: 20
        timeoutSeconds: 5
        httpGet:
          port: 80
Exposing VM Services 
Creating a Service for VM 
To expose a service running on your VM:
apiVersion: v1
kind: Service
metadata:
  name: vm-ssh-service
  namespace: shalb-demo
  annotations:
    service.nlb.kube-dc.com/bind-on-default-gw-eip: "true"
spec:
  type: LoadBalancer
  selector:
    vm.kubevirt.io/name: ubuntu-vm
  ports:
    - name: ssh
      protocol: TCP
      port: 2222
      targetPort: 22
Apply this service:
Using Floating IPs for VMs 
You can assign a floating IP to your VM for direct external access:
apiVersion: kube-dc.com/v1
kind: FIp
metadata:
  name: ubuntu-vm-fip
  namespace: shalb-demo
spec:
  ipAddress: 10.0.10.171
  eip: vm-eip
First, ensure you have an EIP:
Deploying Containers Alongside VMs 
Kube-DC allows you to run containers alongside VMs. Here's how to deploy a simple Nginx container:
apiVersion: apps/v1
kind: Deployment
metadata:
  name: nginx
  namespace: shalb-demo
spec:
  replicas: 2
  selector:
    matchLabels:
      app: nginx
  template:
    metadata:
      labels:
        app: nginx
    spec:
      containers:
      - name: nginx
        image: nginx:latest
        ports:
        - containerPort: 80
        resources:
          requests:
            memory: "64Mi"
            cpu: "250m"
          limits:
            memory: "128Mi"
            cpu: "500m"
Create a service for the Nginx deployment:
apiVersion: v1
kind: Service
metadata:
  name: nginx-service
  namespace: shalb-demo
  annotations:
    service.nlb.kube-dc.com/bind-on-default-gw-eip: "true"
spec:
  type: LoadBalancer
  selector:
    app: nginx
  ports:
  - port: 80
    targetPort: 80
Best Practices for VM Management 
Resource Allocation 
- Allocate appropriate resources based on the OS and workload requirements
- Monitor VM performance to adjust resources as needed
- Use resource quotas to prevent resource exhaustion
Security 
- Change default passwords immediately
- Use SSH keys instead of passwords when possible
- Keep guest OS updated with security patches
- Apply network policies to control VM traffic
Efficiency 
- Use cloud-init for automated VM configuration
- Create VM templates for standardized deployments
- Use the smallest OS image that meets your requirements
Troubleshooting VMs 
Common Issues 
-
VM stuck in provisioning: Check DataVolume status and events
-
VM not accessible via network: Verify network configuration
-
Cloud-init not running: Check cloud-init logs inside the VM
Accessing VM Logs 
kubectl get events -n shalb-demo
virtctl console ubuntu-vm -n shalb-demo
virtctl logs ubuntu-vm -n shalb-demo
Advanced KubeVirt Features 
For more advanced features, refer to the KubeVirt documentation:
Conclusion 
You've now learned how to deploy and manage VMs and containers in Kube-DC using both the intuitive UI and kubectl manifests. This hybrid approach allows you to choose the most appropriate method for your workflow, whether you prefer interactive management or automation through GitOps practices.